Tuesday, July 31, 2018

Designer Challenge Day 2 31-2018

Day 2 is Sue's choice!


Sue chose the black/coppery card stock.

Here is Sue's card:


I loved the look of this copper-y card. I didn’t want to cover it up too much. So, I die cut, using Penny Black’s Flower Frolic die. I added color with ink daubers and distress inks (mustard seed, ripe persimmon, peeled paint). On a strip of  card stock, I stamped the sentiment from Hero Arts Color Layering Bouquet. I adhered it towards the bottom of the card and added the sprig to the left of the card. ~ Sue

Beautiful pops of color, Sue!

Here is my card:


Some days I just get in a Vintage or steam punk mood.  I found these lovely chipboard pieces in my stash I received in a swap.  I tied an ivory ribbon to the copper panel and tied a bow then added a lovely piece of mauve vintage lace below the ribbon.  I then attached the corset using red sticky tape.  I added the heart using pop dots.  I also added the "friendship" sentiment from Tim Holtz using pop dots.  I added the flat-backed pearls and roses with hot glue.  I used a light pink card stock to make a card base. ~ Gracie


Monday, July 30, 2018

Designer Challenge Day 1 31-2018

Welcome to our July Designer Challenge!  This week we received envelopes with similar/same items.  We each (Sue, Anna, and me) chose one of the items and Theresa chose two.  We then made cards using those items.

Here are our choices:


I chose the polka dot napkin, Sue chose the black coppery card stock, and Anna chose the white tag.

These are Theresa's choices for us:


We will be using these later in the week.  Unfortunately, Anna's cards are not available.

Here we go with today's cards!
This is Sue's take on the polka dot napkin!


Starting with the blue and white polka dot napkin, I had no idea what to do. Napkins are not something I often work with. It was an opportunity to stretch and try something new. I gently separated the two layers of the napkin. I was grateful that there was quite a bit of material, so if my idea didn’t work out, I could make a few more attempts. I thought that I would try to use an embossing folder with the napkin, backed with an A2 card panel for stability. I used the Cricut Cuttlebug Kitchen Weave embossing folder. I found that the napkin layer adhered itself to the card panel with the embossing. However, to ensure that they didn’t separate, I added some adhesive along the edges. I looked for something equally bold and graphic to add to the card. I found some red striped paper. I cut a 1.25”x5.5” stripe with it and adhered it, a little towards the bottom of the card. To complete the card, I stamped the “hello” from Paper Smooches Chit Chat stamp set and die cut the sentiment using CAS-ual Fridays Fri-dies Tag Buddies. I found a scrap of gold Stampin’ Up ribbon to complete the card. ~ Sue

Beautiful card, Sue!!!

Here is my card:


Wow.  Sue and I went two completely different directions!  That is what makes these challenges so much fun!  I started by adhering the separated napkin to a white card stock panel using Stick-It.  This is the easiest way I have found to work with a napkin.  No hot iron involved!  I then inked the panel with clear Versamark ink and applied Sticky embossing powder.  After heating I applied Diamond Dust embossing powder and heat set it as well.  Now my table sparkles!  I die cut the sea horse, the grass, the shell and the sentiment from scrap card stock pieces.  The sea horse, grass, and shell are from HOTP.  The "hello" sentiment is generic.  I adhered the panel to a light pink piece of card stock 4 x 5 1/4 in.  I then made a card base of bright pink.  I love the bright colors! ~ Gracie


Sunday, July 29, 2018

Clean & Simple Sunday 31-2018

Hello!  It's Gracie here this week to bring you our fifth week of July which makes it our Designer Challenge Week!  We will be showing all those creations Monday through Friday!  But today I will start off with a clean and simple card.

Here is today's card:


I started by using a lattice die cut found in our designer envelope.  I found some coordinating paper in my stash.  I added a strip of white card stock behind the die cut and adhered the panel to a white card stock base.  I die cut the "thanks" sentiment (I believe it is from Simon Says) several times to make it thick and adhered it with pop dots.  The yellow roses just look like summer to me.  I also added a small bronze butterfly.  I used hot glue for the butterfly and the roses. ~ Gracie

Saturday, July 28, 2018

Card A Day Challenge Week Four of July 2018 - Scene-It Saturday

Hi everyone,

Welcome to the last day of the Card A Day Challenge for July! Today's theme is Scene-It Saturday, where we create a scene card. Here is my card below:


I just love the kitty couple snuggling up in the sunset watching the fireworks, don't you? The cats are from the Better With You stamp set from Gina K Designs, and the fireworks are called Pyrotechnics from The Ton Stamps. I used  an oval stencil from Brutus Monroe and taped it to my card. Then I started to blend distress inks in Antique Linen, Victoria Velvet, Seedless Preserves, Chipped Sapphire, and Black Soot (this color combination came from Jennifer McGuire, and I keep this combo on hand for sunset pics!).  Once that was done I removed the stencil and stamped the kitty couple in black Archival ink. The fireworks were embossed in gold, silver, and black glitter.  The sentiment was stamped in black Archival ink as well. Finally, I cut the card down and placed it over a black card base.

Thanks for stopping by,

Colleen

Friday, July 27, 2018

Card A Day Challenge Week Four of July 2018 - Freestyle Friday

Hi everyone,

Welcome to another day of Card A Day Challenge! Today is Freestyle Friday, where we design whatever technique we choose, staying within the monthly theme of summer/beach birthday and the color scheme of red, white, and blue.

Here is my card:


Today's card makes me happy just to look at it, because it is everything that represents summer! The cheerful colors, the sunshine and blue skies, and simple days of summer. Ahhhh, now I just need the beach...sorry, back to the card! I used my Copic markers Y15 and Y17 and a ruler to create the yellow diagonal lines. Then I grabbed my WPlus9 Hello Sunshine stamp and die set and added my sentiment and the cute sun resting behind it. To make the sun shine (no pun intended there), I added Glossy Accents. I framed my piece by die cutting it and adding foam adhesive to it, and then I placed it on a white card base. I finished it off with watermark embellishments. I think this is one of my favorite cards of the week.

Thanks for stopping by,

Colleen

Thursday, July 26, 2018

Card A Day Challenge Week Four of July 2018 - 3D Thursday

Hi everyone,

Welcome back to Card A Day Challenge! Today is 3D Thursday, where we make cards that are 3 dimensional such as boxes, step cards, and so on. I'm not great with 3D cards, so I decided to go with what I consider to be a 3D card. Here it is below:


Let me start by saying that the bottle is NOT the 3d card! I wish! The little tag on the bottle is my 3D card. Here is a closer look at it below:


This is a little wine bottle tag from Spellbinders dies that I love! I die cut it on some patterned paper and then add Prima flowers and leaves along the stem. Finally I tucked some ribbon behind the flowers to give more interest. I have been wanting a tag like this forever because I give wine as gifts frequently as birthday presents. So now I don't have to use a bag, I just need that cute tag!

Thanks for stopping by,

Colleen


Wednesday, July 25, 2018

Card A Day Challenge Week Four of July 2018 - WOW Wednesday

Hi everyone,

Welcome to another day of Card A Day Challenge!  Today is WOW Wednesday, where we turn up the volume on a clean and simple card, keeping in mind the monthly theme of summer/beach birthday and red, white, and blue colors. Today I will show you the original version and the WOW version.

Here is the original clean and simple version:


And below is the WOW version:


This card has more going on than the original, and it's a summery birthday themed card. The Hooray die cut from CP Designs was embossed in WOW Embossing powder's Wanderlust, which is so glittery! The white background has a pattern, and the black/white designer paper from CP Designs is busier than in the original. Finally, I added some small black flowers and a touch of black Nuvo paste over them. This picture does not do this card justice! In person it shines and sparkles all over the place! So, for me, it helps to choose one of my previously made cards that was clean and simple, and change 3 things about it to give it the WOW factor.

Thanks for stopping by,

Colleen

Tuesday, July 24, 2018

Card A Day Challenge Week Four of July 2018 - Technique Tuesday

Hi everyone,

Welcome to another segment of Card A Day Challenge!  Today is Technique Tuesday, where we apply the technique of the month to the theme. This month's theme is summer/beach birthday, the color scheme is red, white, and blue, and the technique is stenciling, where we use stencils on some part of our card.  This was perhaps my favorite Challenge day because I love to use stencils! Today I am showing you two cards, because this technique is a two-for-one deal. Here are my cards:


I chose a star stencil and color scheme for July because of the patriotic month of July!  For the card on the left, I used distress oxide inks in Fired Brick and Chipped Sapphire, and blended through the stencil, overlapping the colors to create a 3rd color.  Then I removed the stencil and lightly misted water over the inks to get the colors moving a little.  Then I took that same stencil that still had some ink on it and placed it over a clean piece of cardstock and, this time, applied a light molding paste over the stencil, bringing the colors with it. The final result is the card on the right. You can see by the card on the right that the colors are more subdued than the card on the left, but this two-for-one technique gives you two great looking cards that look unique! Finally, I added a sentiment that says "I'm proud to call you Home".

Sandy Allnock has a tutorial called 7 ways to use your stencils (or something like that), and that's where I got this idea from. You can whip out several cards quickly using this technique!

Thanks for stopping by,

Colleen

Monday, July 23, 2018

Card A Day Challenge Week Four of July 2018 - Mistletoe Monday

Hi everyone,

Welcome to the Card A Day Challenge! Today is Mistletoe Monday, where we create a holiday card using the July theme of summer/beach birthday and color scheme of red, white, and blue. Here is my card for today:


I struggled with doing a holiday card with a July theme, so I decided to stick with the theme colors of the month and then add a pop of holiday color to this card. This way the card met the July challenge theme yet also looked like a holiday card. I guess that's why they call this a challenge, eh? (smile) The Charlie Brown-like tree is from a stamp set called Bright Baubles from CP Designs. I stamped the baubles in bright colors of red, blue, pink and yellow and topped it with a silver star. To make the baubles shine, I added Glossy Accents over them. The tree needed something to stand on, so I chose some books from The Ton Stamps to put beneath it. I hand wrote the title "Christmas Story" on the bottom book to stay within the holiday theme. Finally, I added my sentiment and a few more silver stars, and placed the finished piece over some beautiful black and white cardstock from CP Designs called All That Jazz. This card really pops and I'm happy to say that I will be doing more holiday cards like this one!

Thanks for stopping by,

Colleen

Sunday, July 22, 2018

Card A Day Challenge Week 4 of July 2018 - Sweet and Simple Sunday

Hi everyone,

I'm back for a week of Card A Day Challenges!  July's theme for this challenge is summer/beach birthday and the color scheme is red, white, and blue. Today's Card A Day Challenge is called Sweet and Simple Sunday, meaning create a card with clean and simple lines and lots of white space.  Here is my card below:


I went with red, white, and blue sparkly, embossed fireworks!  It is July, afterall! The stamp set is called Pyrotechnics from The Ton Stamps. Next I framed my fireworks by die cutting and propping the piece up with foam adhesive. Then I placed it on a white card base. I finished with the Sentiment in black, sparkly embossing powder and added a few sequins.

That's all for today, come back tomorrow for Mistletoe Monday where I make a holiday card! You can see all of the challenges by going to cardadaychallenge.blogspot.com.  It's a great place to go and find inspiration!

Thanks for stopping by,

Colleen

Saturday, July 21, 2018

Scene It Saturday 29-2018

I worked as an RN for 32 years before becoming disabled.  In those 32 years I worked in Pediatrics, Geriatrics, Surgery, as a Supervisor, a Director of Nursing, Nursing Instructor and a Precert Nurse.  But the most FUN job was working nights while my kids were little in our local hospital in the Emergency Room (yes, Room - not Department).  Our hospital was built in the early 60's.  The ER was located at the back of the hospital and at night to get in you had to ring a door bell.  I saw many, many things come through that door and sometimes had to go out in the parking lot to take care of things (I delivered a baby in the back seat of a car).  The walls were painted white and we had red and yellow tile as a border at chair rail height.  The door was one of those big heavy wooden ones and it had a large round hole so you could see what was going on.  This was back in the day before HIPPA and the last thing we worried about was patient privacy!  We slapped you in a gown and threw you on the gurney!  The Doctor was "on call" which meant he may or may not be in the hospital but I had a pager to reach him.  It was so far back in the day when I graduated from nursing school in Mississippi we still wore white uniforms with white caps - mine had a black stripe because I was an RN; the LPN's had green stripes.  This card reminds me so much of those days I smiled and laughed while I was making it.  So it's my "ER" scene!

Here is my card:


The stamp set is from Art Impressions which I just love.  I made the fron to look like our old ER.  The band aids are die cuts.  I added the red flat back pearls as door hinges and a handle and large round flat blue rhinestones as the wheels on the exam table.  I colored the images with Spectrum Noir Markers.  I hope you enjoy it as much as I did! ~ Gracie

Friday, July 20, 2018

Freestyle Friday 29-2018

Today I can just play with paper and stamps  :)  I chose stamps from a stamp set (source unknown - it was sent as a gift).

Here is my card:


The stamps are stamped with brown ink on ivory card stock.  I inked the edges with brown ink and fussy cut the cup of coffee and coffee beans and oval cut the sentiments with my Big Shot.  The paper is from Coordinations.  I love plaid!  I used the yellow to accent and the polka dots are also from Coordinations.  I cut a 8 1/2 X 4 1/4 inch panel and creased it to make the Z card base.  I attached the brown Z then covered it with the plaid panels.  My best friend and I eat breakfast every Saturday morning and the waitress knows to bring our coffee without asking - she will be getting this card in the mail! ~ Gracie

Thursday, July 19, 2018

Thursday in 3D 29-2018

Coming up with something 3D is always a challenge!  But I have a cruise coming up and my Bestie is going with me.  The cruise line we are going on no longer gives you the chocolate at turn down so I am planning on taking some Andies mints to surprise her.  The box I made today will be perfect!

Here is the box:


I used a Silhouette cut file.  I love the polka dot flip flops!  I attached the flowers in the center with a large brad (any excuse to use a brad is a good excuse - there is a never-ending supply floating around in my craft room!)  I used the super duper red double sided tape on the folds of the box so it would keep its shape on its way to New Orleans hid away in my carry on bag.  I know she is going to love it! ~ Gracie

Wednesday, July 18, 2018

Wow Wednesday 29-2018

It's Wow Wednesday!  Time to take a previous card and make it sparkle and shine!  After sitting and looking at yesterday's card I thought it was just not "enough".  If you know me, you know I'm all about that bling!

Here is the card before I worked on it:


And here is the card when I completed it!


I started by removing my sentiment with Undu (love it - adhesive is still sticky after coming off perfectly and drying!)  I added double-sided tape and dug out some glitter (yes, glitter - now my table is sparkly) and applied it to the tape pressing the glitter down and shaking off the excess.  That's when my table got sparkly!  I moved the chain on the treasure box to make it look like it is lying on the ocean floor and attached it with a glue dot.  I added the brass clock with a glue dot where a printed clock was on her tail.  Then I spruced up her hair with a bit more color (Prismacolor pencils( and added blue gel pen highlights.  Then I gave her a crown.  I really like the second version better! ~ Gracie

Tuesday, July 17, 2018

Technique Tuesday 29-2018

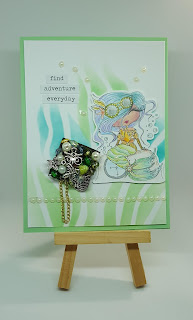
Ooo, wee!  Today is fun with stencils!  I bought some new digital stamps recently with the steam punk feel and one is a mermaid.  Perfect for summer and summer colors!

Here is my card:


I started with a simple stencil (it's out of the package and I can't remember the source!)  I used Tim Holtz oxide inks blending green and blue to try to make some sea weed.  The stamp was printed from my computer; she is a Sherri Baldy image from her Etsy shop (I love all her Besties!)  I colored her with Prismacolor pencils and added highlights with metallic pens.  I made a "treasure box" from a 1 inch square chipboard covered with gray card stock and I glued several charms and gems and even threw in a little gold chain.  The sentiments and words from Tim Holtz.  The panel is placed on a light green card stock base.  It was time consuming but I get lost when coloring! ~ Gracie

Monday, July 16, 2018

Mistletoe Monday 29-2018

Happy Monday, everyone!  Hope your week is off to a great start!  I'm having some Winter Summer fun!  Santa is ready for the beach and Mrs. Claus was not missing the boat!

Here is my card:


Now doesn't that look relaxing?

I started my card today with a digital image from Dearie Dolls (unfortunately she is no longer drawing images).  I printed it on white Spectrum Noir card stock and colored it with Spectrum Noir markers.  I cut a mat of lime green and used the same lime green to mount my sentiment on.  The sentiment was printed on my computer using a Christmas Adventure font.

I used bright yellow card stock to match Sants's drink and Mrs. Claus' flower in her hair.  I turned my A2 sized card into an easel.  I wish I was on a beach, somewhere...

Happy Crafting! ~ Gracie

Sunday, July 15, 2018

Sweet & Simple Sunday 29-2018

Hello, everyone!  Gracie here this week for a little red, white and blue fun!  I started today with a simple quilt card for the Fourth of July.  When our children were very small and Memphis still had the Sunset Symphony play down by the Mississippi River with a HUGE fireworks show and John Hyter singing "Old Man River" we would celebrate by taking a quilt and sitting on the levee.  Good times long gone...

Here is a link to make an easy pinwheel that looks like a quilt:

https://www.youtube.com/watch?v=fWYQGUYfx0k

Here is my card:


I started with a navy card stock base and some patriotic paper sent to me in a swap.  I used red card stock for the base of the pinwheel.  I die cut a small star with glitter white card stock and attached my sentiment trimmed from my patriotic paper to my card with white glitter eyelets.

I hope you had a wonderful Fourth!

Happy Crafting ~ Gracie

Saturday, July 14, 2018

Scene it Saturday 28-2018

Wow, the week sure flies by. It's my last day as designer here at Card A Day and I have one last card for you.


The theme for July is summer/beach birthday and the color scheme is red, white and blue. For Scene it Saturday, the theme is to create a scene card.

Here's my card


I inked up the cute little beach houses from Avery Elle’s Beside the Sea stamp set with Memento Tuxedo Black ink and added color with Copic markers. I used the matching die to die cut the houses out. I made a very simple scene with light blue cardstock for the sky and again, using my Creative Memories 12” decorative trimmer to cut out a sloping sandy beach. I popped up the houses. The sentiment is from Paper Smooches Salutations stamp set.

Thanks for hanging out this week. Hope to see you again next month.
sue

Friday, July 13, 2018

Freestyle Friday 28-2018

Hi! It's Sue back with another card for you. 


The theme for July is summer/beach birthday and the color scheme is red, white and blue. For Freestyle Friday, the challenge is to create whatever I want.

Here's my card


I stamped the lighthouse from Lawn Fawn’s Life is Good stamp set with Memento Tuxedo Black ink and added color with Copic markers. I used the matching die to die cut the lighthouse out. I created a little scene with some leftover kraft cardstock, from Tuesday’s card for the sandy beach. For the waves, I used a scrap of blue cardstock and the “negative” side of Reverse Confetti’s Double Edge Scallop Border Confetti cuts die. The seagull is from the Lawn Fawn’s Life is Good stamp set. I popped up the lighthouse with dimensionals for a bit of dimension.The sentiment uses Papertrey Ink’s Keep It Simple: Birthday stamp set.

Thanks for stopping by. Come by tomorrow, when I'll have my last card for my week as designer here at Card A Day.
sue

Thursday, July 12, 2018

Thursday in 3D 28-2018

Hi! It's Sue, this week's designer with a new card.


The theme for July is summer/beach birthday and the color scheme is red, white and blue. For Thursday in 3D, the challenge is to make cards that are 3D. 

Here's my card.


I made a pop-up box out of medium blue cardstock and decorated the flaps with tone on tone blue paper. The fun images are from Avery Elle’s Cool Treats stamp set which I stamped with Memento Tuxedo Black ink and added color with Copic markers. I fussy cut the images out. Using some acetate, I cut some 0.5” strips to which I adhered the images to one end and the inside of the box to the other end. For the sentiment, I used Lawn Fawn’s Tiny Tag Sayings: Birthday stamp set stamped onto red cardstock and then punched out with a 1.25” circle punch.

I like that these types of cards lie flat and fit into a regular A2 envelope.

Thanks for popping by. Hope to see you tomorrow.
sue

Wednesday, July 11, 2018

Wow Wednesday 28-2018

I'm halfway through my week as the designer here at Card a Day. 


The theme for July is summer/beach birthday and the color scheme is red, white and blue. For WOW Wednesday, the challenge is to turn up the volume on a card.  I started with Sunday’s card, with the jeans pocket. 

Here's what Sunday's card looked like.


Here's what the finished card looks like, once I turned up the volume.


To turn up the volume, I added rhinestones along some of the stitching on the pocket as well as on the edges of the sunglasses. I also added Wink of Stella to the sunglasses for a bit more sparkle. Here's a close-up.


Thanks for stopping by. Hope to see you back here tomorrow.
sue

Tuesday, July 10, 2018

Technique Tuesday 28-2018

Hi! It's Sue. I'm this week's designer and I have a new card for you today.

The theme for July is summer/beach birthday and the color scheme is red, white and blue. For Technique Tuesday, the challenge is to use this month’s technique which is stenciling (use stencils for some part of the card). 

Here's my card


I reached for my STAMPlorations ARTplorations Clouds stencil and some medium blue cardstock. With an ink dauber and Color Box Frost White pigment ink, I made some clouds in the sky. I like the way the ink daubers make puffy clouds. I pulled out my Creative Memories 12” decorative trimmer and kraft cardstock to make a rolling beach. I then stamped some beach images using Lawn Fawn’s Life is Good stamp set with Memento Tuxedo Black ink and added color with Copic markers.  Using the matching dies, I die cut the images and adhered them on my beach. I popped one of the sand pails up for some dimension. The sentiment is from Simon Says STAMP’s It’s Your Birthday stamp set.

Thanks for stopping by. Please stop by tomorrow, when I'll have another new card for you.
sue