Friday, March 31, 2017

C.A.S.E A Card Friday #13-2017

This is the card we are C.A.S.E.ing today.


The colors against the black can make for a striking card like Sue's


I started this card by die cutting several branches using Memory Box’s Large Olive Branch. This was one of my purchases that I “had” to have and used a few times when I first received it. It’s been sitting in my drawer for sometime. I found that it was a bit difficult to work with. What I figured out was that keeping both the negative and positive pieces together, the addition of colour using ink daubers and distress inks (mustard seed, spiced marmalade, picked raspberry, twisted citron, mermaid lagoon, mermaid lagoon and salty ocean) was much easier and the die cut kept its shape. For the thin lines below the sentiment, I inked up a thin piece of cardstock with spun sugar and picked raspberry and then cut really thin strips. The sentiment is from Catherine Pooler Designs’ Butterfly Notes stamp set which was heat embossed with white embossing powder. - Sue

I used a different technique for the color.


I used a technique I found online where you heat embossed in white and then colored over that with alcohol markers.  For this technique to work well, the stamps need to have fairly large areas of solid on them.  I used a stamp set from CTMH called Dreams Come True that had some solid flowers and leaves on it. I stamped them in various places like they were hanging down from the top with my Versamark.  I then hand drew lines for stems with a Ranger Perfect Medium Pen and embossed with white embossing powder.  It ended up not totally covering, but I decided that I was OK with the black showing through.  I might try with white pigment ink next time to emboss.  I then used a couple of shades of red and three shades of yellow Spectrum Noir pens to color the flowers and green for the leaves and stems.  The good thing about this technique is that the markers don't show on the black if you go out of the lines of the flowers.  The effect was pretty against the black.  The sentiment from CTMH (Big Hug) was also embossed and left white. I then found ribbon pretty close to the colors to add to the bottom.  I am really trying to use up all that ribbon that just sits there. - Denise

Thursday, March 30, 2017

Technique Thursday #13-2017

Today's technique, just like our March Challenge, is an oldie, but goody.  It is emboss resist and even though the technique is one that has been around for a while, it is a classic with wonderful results.

Sue has some wonderful colors on her card.


I started with Impression Obsession’s Cover-A-Card Flourishes stamp, Versamark ink, white embossing powder and my heat tool. The Cover-A-Card stamps are a great way to create a background for your card. I hadn’t used any of mine for some time. I added colour with ink blending tools and distress inks (twistsed citron, mermaid lagoon and faded jeans). This would form the background of my card. To finish, I added a strip of cardstock and the sentiment, using Stampin Up’s Made for You stamp set and Stampin Up’s oval and decorative label punches to complete the card. - Sue

Mine also incorporates other textures.


I embossed an image from the Inkadinkado set called Down by the Seaside in black.  Like so many of my stamp sets, I used an image from it once and then set it aside.   I decided to do it on velum and then rubbed over the image with Distress ink in three different yellow and orange colors.  I found that it is better to start with a bigger piece and then tear around what you want when you are finished.  I used double sided tape at the top to adhere it to some burlap paper (from DCWV) and then punched two holes at the top of that.  I ran twine through them and added a bit of ribbon in the knot.  You can pick up this twine for cheap at farm supply stores. I also have tons of ribbon purchased several years ago and am forcing myself to add more of it in my cards. The sentiment was stamped on more velum and torn, then taped behind the letters so it didn't show.  This was all attached to a card base and I trimmed the burlap to size after attaching it. It uses more texture than I normally do and I like it. - Denise

Wednesday, March 29, 2017

Card Sketch Wednesday #13-2017

The sketch for today is by MojoMonday.

Sue turned it to the side to create this charmer.


While looking around my craft space for things I hadn’t used for awhile, I found some “old” Stampin’ Up’s patterned paper. I don’t even know what pack they came from. The sentiment is from Stampin Up’s One Big Meaning. The heart was cut using Paper Smooches’ Hearts die from a scrap of white cardstock. I added colour with a Picked Raspberry distress marker. I don’t think I’ve used my markers for a very long time. It was nice to be re-acquainted with them! - Sue


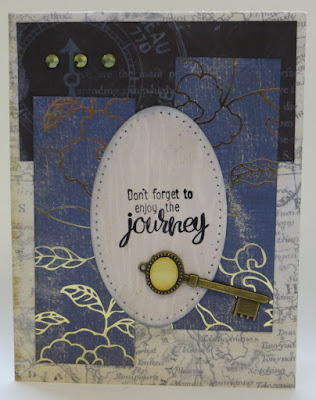
I mixed a few patterns for my card.


I have a lot of paper stacks.  This one from DCWV called The Tradewind Stack is at least a couple of years old, so I pulled it out and choose four different patterns.  They have sort of an old world feel, so I added a key from Making Memories as my embellishment.  I have all these embellishments that I have purchased over the years and then don't use.  I don't tend to buy them anymore, but am instead forcing myself to add them to my cards.  The metal accents are from Ki. The sentiment is from Unity (You Can and You Will). - Denise

Tuesday, March 28, 2017

Birthday Tuesday #13-2017

It's birthday time again. 

I love puns and Sue has one that is perfect for kids, 
big and small alike.


I looked through my Stampin’ Up collection to find a stamp set I hadn’t used for a while. There were many sets – LOL!  I chose I Dig You stamp set. Before the MISTI, I had so much difficulty stamping the gifts in the back of the truck, so I kind of gave up trying to use this set. With the MISTI, it was quite easy! Using distress markers (faded jeans, mowed lawn and festive berries), I added colour to the gifts. - Sue


I agree Sue, what did we do before the Misti? Sometimes we can use our old things with different techniques like I did here.


This card was done with paper from another old stack I had called The Mod Retro Pack. The paper had this wonderful pattern of flowers over a pink border. I cut it strategically to showcase the flowers for the size of my card. The border was glossy, but the flowers were not.  When I purchased the paper, I didn't know about heat embossing, but now that I do, I used a Ranger Perfect Medium pen to go over the flowers and leaves.  I then put clear embossing powder over them and heat embossed them.  I believe it makes them go together much better with the pink border.  Another page from the pack to use as a mat and for the sentiment, printed off my computer and die cut completed the card. -Denise 


Monday, March 27, 2017

Masculine Monday #13-2017

This is our day for masculine cards and Sue brings us this sporty card with one of my favorite embossing folders.


I started with a piece of silver cardstock and the Cuttlebug Diamond Plate embossing folder. It was another embossing folder that I hadn’t used for some time. I stamped the race car from CTMH’s Fast and Furious stamp set. The sentiment is from Stampin’ Up’s Rev Up the Fun stamp set. I used pewter brads to add to the masculine-look. - Sue

I love making personal cards and this is another one. -


Inside

The ship stamp was one of the first I purchased from Unity about a year and a half ago, but only used once or twice.  They have several quick one minute tips on their website and one of those was to stamp on Kraft paper and then use a white pencil to color in parts of it.  I decided that would be a neat technique to do with this stamp.  I then stamped the sentiment from Pink by Design set that has all kinds of sea and cruising sayings on it, but I don't know what it is called. I purchased the set after a cruise I took over two years ago. I then heat embossed it in white.  The technique also calls for spattering it in white paint, but I don't do the messy look well and since it is for a man in his late 80's I didn't think he would appreciate it either, so I kept it clean and simple. - Denise


Sunday, March 26, 2017

Clean and Simple Sunday #13-2017

This is our final week in March using something (paper, stamps, die cuts, etc.) that we haven't used for a year or more.  We all have them if you have been paper crafting for over a year

Sue starts our Sunday with an adorable clean and simple card -


For this card, I was looking through my collection of embossing folders for an embossing folder that I hadn’t used for some time. There were many to choose from  - LOL! I picked the Craft Concepts Embossing Folder – Ramsey the Sheep. I started with DCWV grey (white core) cardstock in the embossing folder and lightly sanded the embossed edges to expose the white core. The sentiment is from Clearly Besotted Feeling Sheepish stamp set which I put on a banner, which I popped up with dimensionals. - Sue 

I combined something really old with something new.


I have a big pad of 12 x 12 paper from DCWV called The Girl Stack.  I am sure it is one I purchased the first year or two I started working with paper crafts about seven years ago.  I flipped through it and found these coordinating papers which looked very Springy to me.  I stamped them with a new stamp set I have called Bunny- Keep You Forever by Unity Stamp Company.  I did a paper piecing technique where I stamped on the blue paper and then again on the pink.  I cut various parts out of the pink and glued them to the blue.  I love this technique even though I hate fussy cutting because I love the effect. - Denise

Saturday, March 25, 2017

Inspiration Saturday #12-2017

Inspiration pictures can inspire different cards because we all see and feel different things when viewing an image.

We start with this sentimental card from Gracie.


I know the picture should make me want to do an under the sea card but I recently bought a lovely digital stamp from Beccy Muir  that I have been wanting to use!  I found some black glitter dots in my Scrap rack that are from old Creative Memories!  I sponged my image using the colors in the paper (Crushed Olive, Tumbled Glass, Dried Marigold, Spun Sugar, and Shaded Lilac).  The sentiment also came from the same stamp set. ~  Gracie  

I have a simple card - 


I have had a Nemo die and matching embossing folder from Cuttlebug for years, but have never used them.  I pulled them out for this challenge and colored it with an orange Spectrum Noir marker.  I added the black with a fine tip black marker.  The bubbles were just circles cut on my older Expression.  The sentiment came from CTMH.  I tried to do the bubbles with Glossy Accents, but they just didn't work out on the larger circles, so I redid them and covered them with Wink of Stella which I also used on the fish.  The paper is from a 6 x 6 pad called Walking on Sunshine by Echo Park. - Denise


Friday, March 24, 2017

C.A.S.E A Card Friday #12-2017

Today we C.A.S.E. this elegant card.


Gracie made her own stunning version.


What a pretty card to CASE!  I looked in my Scraprack and found a light green button.  I embossed a panel then die cut a circle then edged it with a Fiskars border.  I stamped the image and sentiment on the inside of the card using SU Coastal Cabana ink. I tied the button on with light blue and white twine and added a few heat set rhinestones.- Gracie

I have a farm theme-


I chose to use a Deep Red stamp called Rooster since I have had it for a while.  Since there is a lot of detail, I used a method where you use dye ink pens to scribble on the stamp itself.  I used a combination of Marvy Brush Markers in a golden yellow, a red, a burgundy, and a brown.  You start with the lightest color used all over the stamp and then scribble the others (lightest to darkest) randomly over the stamp (I did make sure to use the red on his comb). I did huff on the stamp to moisten it before I stamped it.  It works best on glossy paper, but that isn't what I wanted to use as the card base, so I used my Misti and colored and stamped a couple of times to get it dark enough and place it exactly where it needed to be to show through the opening.  I cut an opening in the yellow cardstock with a hexagon die in my Cuttlebug.  I then ran it through an embossing folder called Chicken Wire by Cuttlebug.  I used another die for the bottom cut.  Those particular dies were one of the first I purchased and used them to make swing cards probably four years ago.  I had never used the largest one, but it was the perfect size to do the bottom.  I taped the die were I wanted it and only cranked it through just until the bottom was through, then backed it out so that the top wouldn't cut. I bit of Distress Ink to highlight the design and popped up on foam tape.  The sentiment came from a set called Catch you Later by CTMH and I selectively inked it to make it go across the bottom in one line.  I like the look and will probably use this as inspiration for other cards.- Denise


Thursday, March 23, 2017

Technique Thursday #12-2017

The technique of stamp tracing brings a different look to your stamps and a video by Jennifer McGuire on how to do this can be found here.

This technique can be a little time consuming, but Gracie shows how stunning the results can be.


Oh, dear.  The technique today is stamp tracing and it was difficult for me.  I started with a royal blue base and stamped a Technique Tuesday stamp called Gallica Rose with light pink ink.  Then the fun began.  I used a silver gel pen and a bronze gel pen to trace the rose and leaves.  The sentiment was stamped in white and heat embossed and is from another Technique Tuesday stamp set Hyacinth.  Flipping through my Scraprack I found the little silver cat and attached him with blue and white twine.  The panel is mounted on bronze paper.  It really  shines in person! – Gracie

Wednesday, March 22, 2017

Card Sketch Wednesday #12-2017

Sketches are one of the great secrets of card making and this is one makes a great place to start.


Gracie has a dog-gone great card here.


Today I looked through my Scraprack and found some dog print paper in with my animals section.  I have no idea how long I have had it!  I did have a cute little stamp set from Pink and Main.  I stamped the dog and sentiment then die cut them .  The dog was colored with Spectrum Noir markers.  I used red, black and white cs and 2 red enamel dots. ~  Gracie  

I keep using my pad from yesterday -


I decided after using The Far East Stack by DCWV yesterday, that I needed to use it some more and so did this card.  The medallion is fussy cut from one of the pages.  I then stamped the Hope and heat embossed it in gold.  I used gold washi tape wrapped around the edges of a couple of the shapes to set them off.  Actually a quick card to do. - Denise


Tuesday, March 21, 2017

Birthday Tuesday #12-2017

Birthdays seem to come all too often and Gracie has one of her signature easel cards to show us.


Today I flipped through my Scraprack and found a key.  There were 4 of them.  Shameful.  The key looks old and well traveled so I dug out a stencil set from Firefly called Style Travel.  I sponged the stencils with Antique Linen Frayed Burlap, Rusty Hinge, and gathered twigs.  I also used an embossing folder for more texture (crackle).  The card base is brown cs; I used a strip of burlap on the inside to place my sentiment.  It is cut from an embossed panel and lightly sponged with Frayed Burlap. ~ Gracie  

My card took on an Oriental touch.

Inside

Okay, confession time.  Part of the Totally Tiffany organizing thoughts are to date your paper pads or kits on the back (along with what you pay for them).  As you use papers you put a tick mark on it so that you can see if you are really saving money by buying a whole pad of paper.  According to the date on the back of the DCWV pack called The Far East Stack, I purchased it in August of 2014 and had used 1 piece out of it.  Yikes!  It is such beautiful paper, I don't know what I am saving it for, so here is a card using parts of 4 different sheets.  I wrote on the front piece with my Explore using a Perfect Medium pen which allowed me to use gold embossing powder on it and still make it personal. The inside was stamped with a set from Club Scrap called Moroccan Spice Greetings.  I also used some gold washi tape in the middle of the cream piece and added three enamel dots to complete it. - Denise
P.S.  I am out of the habit of putting the dates on the back of my new paper pads, but really need to start again.  Maybe it would discourage me from buying more, but probably not, lol.

Monday, March 20, 2017

Masculine Monday #12-2017

Our Masculine Monday brings a beautiful card from Gracie.


I love how this card turned out!  I chose another button today that's olive green so I made an olive green card base.  The stamp is a digital image from Becca Muir.  I printed it on white cs, sponged it with Mustard Seed, Tumbled Glass, and Crushed Olive then fussy cut it.  I mounted it on white cs and used a Stampabilities sentiment.  I mounted the panel on cranberry cs for a pop of color.  I tied on my button with black twine. ~ Gracie  

I went to my stash of 6 x 6 pads to start my card-


I have a lot of 6 x 6 pads and am sure I have had My Favorite Things by My Minds Eye for a couple of years.  I flipped through and found this cute mustache pattern.  It is a double sided paper and the blue stripe was on the other side.  I cut 1" strips and flipped 3 to the striped side.  I have a stamp set that had the bigger mustache and pointing hand on it.  I stamped the mustaches three times on two of the strips using my homemade Misti to be able to stamp the image in a line.  The Birthday wishes came from another stamp set.  Since I didn't keep the names of my stamp sets back then, I don't know what either of them are.  The strips were mounted on a black card base. - Denise


Sunday, March 19, 2017

Clean and Simple Sunday #12-2017

March is our month to use something old (over a year) from our stash.

Gracie starts this Sunday with a clean and simple card.


The extra challenge this month is to use something  you haven't used in a year.  Boy, that part is easy!  All I had to do was turn around and look at my Scraprack!  On today's card I chose a button then built my card around it.  The buttons are a bright blue so I made a card base from bright blue cs .  I stenciled white cs with a Spellbinders stencil Floral and Stone using Spun Sugar, Tumbled Glass and Dried Marigold.  The sentiment  is a rubber stamp that I've taken off  the block so I'm  not  sure  of the source.  I tied knots in the buttons with pink and white twine and stuck them down with glue dots. ~   Gracie 

My card stays very simple.


Inside

I decided to return to my roots and use my Cricut Explore without any stamps or other effects.  The cartridge I used is Disney Pooh and Friends.  I have had this cartridge for a very long time because I have a soft spot for all the characters from Winnie the Pooh.  There are only a few layers for Pooh which I cut out of scrap card stock from my stash.  I cut and wrote the speech bubble on the Explore. The was attached to a light blue card base.  The inside sentiment was printed on my printer and I ran a red distress ink around the edge before mounting it inside. So quick and easy to do.  Because Pooh is a simple bear, I kept this very simple. - Denise


Saturday, March 18, 2017

Inspiration Saturday #11-2017

What does this picture make you think of?

Tantalaya made this card with a lovely combination of colors.


The inspiration photo I took the colors gray and white and put it n a red card base for the pop of color. I also made the card after a fellow YouTuber Connie Stewart and the link to the video https://youtu.be/ZTgIRIPWF7Y. I used deco foil adhesive to foil the flag and the accent strip. After stamping sentiment nd accents I added bling and then used white gel pen to put dashes around the outside edge. and to top it off I used a clear Wink of Stella and went over the small flag to give it some sparkle. - Tantalaya

My thoughts went to the old-fashioned kitchen feel.


I have had a stamp set from TPC Studios called Vintage Kitchen for probably 4 years and never used a single image from it.  Since I wanted to do something with a kitchen feel, I looked through that category in my Scraprack and came across this set which I decided was perfect.  I made a mask for the measuring cup and then stamped it with Versamark on a piece of velum paper.  I then masked it and stamped the muffin tin and bowl on either side of it overlapping both slightly on the cup.  I used black embossing powder and heat set the images.  To me it gave it a kind of enamel look just like the picture pieces, but in black.  When I folded the heavy red card stock to make a base, the fold became raggedy even though I had scored it.  I decided to distress the other edges with a pair of scissors to give them the same look as the fold (it is hard to see in the picture).  I tore the top and bottom of the velum and then attached it to a piece of dark gray dotted paper from a 6 x 6 pad from BoBunny called Double Dot Designs.  A sentiment from the same set was stamped on the same red as the card base and cut with a die from my Cuttlebug. and it was done. - Denise

Friday, March 17, 2017

C.A.S.E A Card Friday #11-2017

Happy St. Patrick's Day!

In honor of the day, we C.A.S.E. this card 

Tantalaya came up with a wonderful interpretation 
of the original card.


Inside

On this case card challenge I decided to take the center label die cuts and make the card base the die cuts using the scallop circles and regular dies and using the heart I cut out a scallop heart and regular heart for sentiment. Underneath the sentiment, I took a Hero Arts wooden stamp swirls in MFT Wild Cherry ink. Since the hearts created the center flower I used a flower to accent and finish off the card. - Tantalaya


I was able to use paper from a pad I picked up almost two years ago and never used called Charmed by Authentique.  It is a 6 x 6 pad (I have a real addiction to those) and features two sided paper with solids on one side and patterns on the other.  I love how the colors go together.  I cut two of the shamrock shapes on my Cricut Explore and cut apart the leaves of the second one.  I scored down the middle of each of those and then attached them to the first one.  A green pearl in the middle finished it.  The middle was formed using a set of nesting dies on my Cuttlebug.  The sentiment is from Studio G and I was finally glad to make a St. Patrick's Day card to use it. - Denise

Thursday, March 16, 2017

Technique Thursday #11-2017

Today's technique is repetitive stamping and a quick tutorial on how to do this can be found here.

I love the rich colors and Oriental feel of Tantalaya's card -


This Technique which seemed very simple, was one of the hardest this week. I used Kaiser Craft Hanami Garden 6.5" x 6.5" paper pad and the stamp set. Using the Fan image in the triple stamping technique. I finished it with some sequins to give the card a little sparkle. - Tantalaya

My technique shows up on the inside of my card-


I used a 6 x 6 paper pad that I bought a few years ago called Charmed by Authentique. I used that for the background paper and put the sentiments on the matching solid paper from the pack.  I wanted to make a St. Patrick's Day card for my son and after thinking about the challenge and looking through my stamps, I had an inspired idea (one I thought of without seeing it on Pinterest first) to show the motion of a bottle falling.  I stamped all with Momento Ink and colored the images with Spectrum Noir markers. When doing the inside bottle images, I decided that I would color just the front one.  The stamp set is Birthday Brewing from Raisin Boat.  It looks like they are closing their online store, so I don't think this stamp set is available any more.  The sentiments were just printed off on my printer.  If you let your imagination go, the repetitive stamping can work for a lot of images. - Denise


Wednesday, March 15, 2017

Card Sketch Wednesday #11-2017

Our card sketch today is pretty simple, but could be very versatile.

Tantalaya shows us a very classic black and white take on the sketch.


Today is a sketch and I love using a card sketch especially when you feel like you are in a creative slump. I used the same 7 Gypsies paper pad from yesterday for the one panel and the textured piece is from the same embossing folder Crackle by Darice. I once again took the Nuvo Mousse and rubbed it along the embossed paper. I did change one thing. The bottom piece looked to be another layer, but for my card, I opted to just stamp on the base card for my final panel. what I like was that it gave a simple sketch a little interest. - Tantalaya

I have a card for parents of a new baby girl.


Inside

I purchased a kit on clearance from Hobby Lobby a few years ago from Carta Bella called Baby Mine Girl.  It was marked down to $2.99 and contained several double sided cardstock papers along with stickers.  At the time I thought it would be great for cards to new parents of girls, but didn't really go to it on those few times I needed to do a card like that.  I finally needed another girl card and pulled it out to use. All of the paper came from the kit including the cute Teapot song.  I did chose to use a sticker on the top instead of a square and the side panel is one row of ribbons cut from a pattern paper.  I also used the paper in the inside and stamped with a stamp from Hanpton for Graphic 45. - Denise


Tuesday, March 14, 2017

Birthday Tuesday #11-2017

Happy birthday to you!

Tantalaya has a card that would work for anyone you need to send a card to.


This could also be a clean and simple card too.  I used paper from my 7 Gypsies 6x6 "Paddington" pad. This is one of those forgotten about papers that you wanted to use when you got it but forgot all about it. I wanted the numbers on the paper to be the main thing so I just added the simple Happy Birthday sentiment. I then added stars to it to make it more celebratory. but the color tones makes this card great for a guy birthday, or before you give the card you could splatter a pop of color to take it to the next level. - Tantalaya

Using up more of my stash


When I first started making cards,I purchased a couple of kits from a website that has one deal a day.  These kits have beautiful papers and lots of embellishments, but I soon learned that I didn't use the embellishments too much.  This week I decided to put them to work and pulled out one of the old kits.  It is Indie Chic - Saffron by My Mind's Eye.  Everything but the stamped sentiment came from this including a crocheted ribbon that I attached to the top and bottom.  The stamp I used is from a set by Heartfelt Creations called Fiddlin' Frog.  I stamped parts of it at a time to fit on the tag. - Denise


Monday, March 13, 2017

Masculine Monday #11-2017

Masculine Mondays mean more inspiration for the men in your life.

Tantalaya makes a grunge card that is perfect for the guys.


I went back to an oldy but goody the Stampin Up! Gorgeous Grunge stamp set. I love to make Grunge cards for masculine cards. On this card, I put washi tape on the edges and took the main piece and popped it up using foam tape.I then took a scrap of paper and ran it through the Darice embossing folder crackle. I then took some of the mousse black ash and rubbed it on the embossed piece. finally attaching the sentiment to the very top to finish this manly card.  - Tantalaya

My card is for a four-year-old young man.


Friends of mine recently had a baby girl and I wanted to give their four-year-old son a card telling him how great he would be as a big brother.  I went back to my roots of making cards with my Cricut.  The cartridge I used was called Baby Steps and I can't remember the last time I used it.  The layers of the boy's clothes, strips, and stars came from an old kit I had from Echo Park called A Boy's Life.  The baby clothes were cut from another old pad I had called Nana's Nursery - Baby Girl by DCWV.  I also let the Cricut write the sentiment using American Crafts Brush Markers.  A lot of American Craft markers fit the holder on the Explore which gives great options beyond the Cricut markers. - Denise