Saturday, December 31, 2016

Inspiration Saturday #46-2016

Today's inspiration photo is a cozy seasonal selection.


Elegance is what comes through on Sue's card -


For my card, I was inspired by the snow covered evergreen boughs. I wasn’t sure how to re-create the effect. I tried a few things, until I was happy with the result. I used my MISTI and stamped the tree from Stampin’ Up’s Lovely As a Tree stamp set with Hero Arts Shadow Ink Field Greens. I lightly wiped off the stamp (still in the MISTI), and using a VersaMarker, I inked up the branches of the tree, trying to leave areas un-inked. With white embossing powder and my heat tool, I ended up with this image – cool, right? To complete the card, the sentiment is from Penny Black’s Hello Winter stamp set.- Sue 

This wraps up another year here on Card A Day Challenge.  I want to thank all of our designers for their contributions this year.  They really outdid themselves. Next year we keep things going while changing things up just a bit. Join us tomorrow and see what challenges are in store for the design team and you.- Denise

Friday, December 30, 2016

C.A.S.E A Card Friday #46-2016

If it is Friday, it must be C.A.S.E. a card.  Here is today's card to C.A.S.E.


Sue made it her own with this version -


I needed my MISTI for this card. I pulled out my Simon Says STAMP Lots of Dots stamp set. I inked up the edges of the dots with distress inks (faded jeans, mowed lawn, crushed olive and hickory smoke). I found that it is certainly much easier to ink the edges of the stamp with the small ink cubes. Before “closing the door of the MISTI”, I spritzed the stamp lightly. I found that I needed to repeat this a few times until I achieved the look I was hoping for. The sentiment is from Simon Says STAMP Lots of Thanks stamp set.= Sue

Those overlapping circles are really cool and the color just bring it all together.- Denise

Thursday, December 29, 2016

Technique Thursday #46-2016

This month the designers could choose their favorite technique from this past year.  Let's see what Sue did-


Detail

For this challenge, I chose the heat embossing technique. I started with a piece of watercolour paper. I stamped Stampin’ Up’s Corner Garden stamp set with versamark, added clear embossing powder and heat set. I added colour with Zig Clean Color Real Brush markers and spread out the colour with a water brush. To complete the card, the sentiment is from Catherine Pooler’s Beautiful World Stamp of Approval’s Enchanted Garden stamp set by Sugar Pea Designs, which I heat embossed with silver embossing powder.- Sue

Sue made such a beautiful card with this technique. You can search this blog with the keywords of "technique 2016" and see what technique was your favorite and try it for your next card - Denise

Wednesday, December 28, 2016

Card Sketch Wednesday #46-2016

Card sketches are a great way to start your card and here is a nice one to try -


Sue combines some great Christmas patterns in her card -


I found the Retro Ornaments stamp set by Avery Elle at my local scrapbook store. I saw the images and it took me back to my childhood. I remember those ornaments that mom put on our tree. I stamped an ornament and coloured it in with Copics. I die cut the ornament with the circle for the focal point of the card. Instead of adding a second circle (mostly covered up), I die cut a scalloped circle to help frame the ornament. The printed paper are scraps that have been on my desk from other Christmas cards. The sentiment is from Simon Says STAMP Ornaments Sentiment stamp set.- Sue 

What a great way to use some of those scraps and I also like the ornament stamp that Sue used.  Try making a card from this sketch using the scraps you have from your next project and see what happens.- Denise


Tuesday, December 27, 2016

Color Challenge Tuesday #46-2016

Icy blues are today's color challenge 

Let's see how Sue took this on-


The colors of this challenge make me feel so peaceful. I started with a turquoise piece of cardstock, which I stamped with Stampin’ Up’s Woodgrain stamp set with a darker turquoise ink. The sentiment is Catherine Pooler’s Beautiful World Stamp of Approval’s Enchanted Garden stamp set by Sugar Pea Designs, stamped on gray. To add some interest, I offset the sentiment panel’s mat. With white cardstock, I die cut using Poppystamps Leafy Sprig die and MFT Die-Namics Flower and Leaf Trio. I added a rhinestone to add a bit of sparkle to the card.- Sue

See what you can be inspired to do with these colors- Denise

Monday, December 26, 2016

Mistletoe Monday #46-2016

Mistletoe Monday brings us an anything goes challenge- 


While digging through my stash of stamps, I came across this Stampin’ Up’s Holiday LineUp stamp set. This stamp makes me smile. I stamped the image and added colour with Copic markers. I trimmed the panel to size and matted it with black. The sentiment is from Paper Smooches’ Christmas Sampler. - Sue

Thanks to Sue for making us smile too.

Sunday, December 25, 2016

Clean and Simple Sunday #46-2016

Merry Christmas to all!

Today we have a wonderful card from Sue that uses a blue base.


A detailed look.

I love the look of tone on tone. To create the background panel, I used Impression Obsession Cover-A-Card Flourishes stamp, versamark ink and a rich purple piece of cardstock. I like the subtle effect of the watermark ink on cardstock. For the tag, the sentiment is Catherine Pooler’s Beautiful World Stamp of Approval’s Enchanted Garden stamp set by Sugar Pea Designs. To cut the tag, I used Stampin’ Up’s Scalloped tag Topper punch. I cut a second tag from printed vellum. Some gold cord was added to the tags to complete the card. - Sue

The tone on tone really dresses up the card and enhances the color for a regal look. - Denise

Saturday, December 24, 2016

Inspiration Saturday #45-2016

These cute cookies are today's inspiration.


The mouse is what caught my eye -


I saw a lot of things in the inspiration piece, but in the end I really saw the Mickey Mouse shape the most.  I choose to do a fairly simple and straight forward card.  I cut the Mickey Mouse head shapes on my Cricut Explore using the cartridge Disney - Mickey & Friends. I sized it to fit 5 images on the panel which I knew I was going to put on a 5 x 7 card..  The paper was from a 6 x 6 pad called North Pole by American Crafts.  I just love 6 x 6 pads because you can pick them up for $3 - $4 on sale and they are great for cards. I wrote the sentiment on my Explore too using a gold pen.  I mounted the white panel on a red mat, then placed that on the white base card and it was done. - Denise`

Friday, December 23, 2016

C.A.S.E A Card Friday #45-2016

Here is today's C.A.S.E. card -

.


Denise turned it into a birthday card -


I embossed only the bottom part of a panel with my Cuttlebug using the folder Tropic Bloom.   I then heat embossed the top with a gold embossing powder using the stamp Beyond Baskets by Gina K for the sentiment.  The embellishment is from a stamp set that I have had a while and do not know who it is by.  A ribbon put where the embossing stops along with a bow complete the panel that was then put on a blue card base.  It went together very quickly and is really elegant looking. - Denise


Thursday, December 22, 2016

Technique Thursday #45-2016

Pick your favorite technique from the last year -


I choose a shaker card inspired by the cards found here.  The image and sentiment are from a stamp set by Unity called Magical as Snow. I colored them with my Spectrum Noir markers and cut it out with the same dies that I cut the frame from.  I then cut out the frame with two nesting dies. I cut a piece of acetate with the larger die and glued it to the back of the frame, then mounted that on foam tape.  I learned a trick from others to using an embossing buddy on the edges before taking off the backing to take any stickiness off the edges.  Before mounting that over the image, I added some silver snow flakes that were cut from foil paper with an old punch that I have.  This was put on paper from a pack by Echo Park called Hello Winter.  The sentiment was stamped and cut from the same die set as the frame then inked around the edges with Distress Ink. This was a fun card to do for a special little girl - Denise

Wednesday, December 21, 2016

Card Sketch Wednesday #45-2016

Inspired by this sketch -

Denise created this thank you birthday card -


I make the cards that our company sends out to clients each year.  One client does not celebrate any holiday, so we send them a Thank You card instead to thank them for their business, but I still kept a winter theme.  The smaller snow flakes were cut out of a silver cardstock using a Martha Stewart punch.  The larger snow flake was cut from the same paper using a die on my Cuttlebug. The background paper and strip of blue were from a collection by Echo Park called Hello Winter.  The sentiment stamp is from Painted Greetings by Altenew and was stamped in Versamark and heat embossed in silver.  A great seasonal card that isn't based on any one holiday. - Denise


Tuesday, December 20, 2016

Color Challenge Tuesday #45-2016

Here is today's color challenge- 

Denise came up with a winter card -

.

I started with the plaid paper from a 6 x 6 pad by Authentique called Believe since it had the mix of colors from the challenge.  I then stamped an image from Holiday Hugs by Unity Stamp Co. and used Spectrum Noir markers to color it in with colors to match the paper.  I applied glue to the "fur" color of the coat and poured chunky white glitter on it before it dried to give the impression of fur.  I used some nesting dies to cut out the image and the red mat behind it.  I love nesting dies for this reason and have quite a few shapes of these. Setting it at an angle added some interest. I haven't put a sentiment on this because I might use it for a winter birthday instead of Christmas. - Denise


Monday, December 19, 2016

Mistletoe Monday #45-2016

Anything goes today.

Denise has a Christmas Card that has a masculine touch.


I work as the treasurer for a construction company that only has a few nation-wide clients, so I make our cards to send to their construction departments.  I used a stamp from Unity called Old Traditions since it is one of my favorites.  I stamped the image with Versafine and then used a lettering stamp set from Martha Stewart to add our company name to the door.  This set has a few different sized of letters along with a grooved stamp block to add the letters just like an old fashioned type set.  It really comes in handy to personalize stamped images.  I then colored with Spectrum Noir markers and tore around the image.  Some light blue Distress Ink made the image complete.  I mounted that on a mat made with some plaid paper from a Christmas stack by The Paper Studio and put that on a kraft paper card.  I think it made a fun card and would be fun for a family name or other message on the door too. - Denise


Sunday, December 18, 2016

Clean and Simple Sunday #45-2016

The clean and simple challenge this month is to use a colored card base, nothing white, cream, or kraft.

So here is what I came up with -

This was made from a blank card set in Christmas colors by American Craft.  The inside of these cards are white, which make it great to put your sentiments in.  Our pastor is a real animal lover and this stamp was perfect for his birthday.  It is St. Francis by Our Daily Bread.  The sentiment is from a set by CTMH.  I stamped first and then used a stitched oval die to cut around the image.  I went around the edge with a blue distress ink.  Some ribbon to match the ink on the side and popped the oval up on some foam tape.  I think the dark red really set the image off. - Denise

Saturday, December 17, 2016

Inspiration Saturday #44-2016

If you are looking for the December Last Minute Gifts Blog, click here.

How would you use this inspiration?


Gracie colored up this cutie for us -


Gotta love plaid for Christmas and I didn't have one piece of red and black plaid paper in my whole craft room!  Dang!  So I got out my Christmas mat pad and picked 2 papers.  The image came from a swap (sorry - I don't know the source ).   I colored him with my Spectrum Noir markers and went back over the lines with a black marker because he just didn't stand out.  I added a rhinestone to the star on the tree and some black enamel dots.  Merry Christmas from Mississippi , y'all! ~ Gracie

Tantalaya takes her cue from the browns and plaids and comes up with a wonderful birthday card.


This card I new right away that I wanted to use the browns in this photo some type of plaid red and then a hint of green. So with the diagonal stripe of plaid and the layers of brown from the lace and from the card base to the background paper that was used. This time I wanted to make the green pop on the card so I brought out a few sequins to bring in the green we have in the photo too. - Tantalaya

Inspiration is all around, so let your imagination go and make that card today - Denise


Friday, December 16, 2016

December Last Minute Gifts Blog Hop

No automatic alt text available.

Welcome to the Last Minute Gifts Blog Hop!  You should have arrived from Jearise .  If you are lost this is the beginning Alicia's blog.  As we approach the holiday season, I am sure we are all scrambling to find unique gift ideas. We hope as you hop along you are inspired by each bloggers ideas.

First, we would like to say a HUGE THANKS to our sponsor today.


Theresa is giving away a $20 Stampin' Up Gift Certificate to one lucky winner AND
take 10% off any order placed through her (not available on website) by December 31th. 
Email her at scrapsbygracie@gmail.com with your order. 

All you have to do to win this fabulous prize is comment on each of the blogs.
That's it! It really is easy.  
Of course, we would love it if you became a follower too. 

Comment buttons can be found at the bottom of the post (on most of the blogs).
Now on with the hop!

The Card A Day Challenge Team did some packs of cards that can be done very quickly and are always a great gift.

First we have Robbie who made these classic black & white cards
 with a matching box -
T


 Here is a cute gift for anyone who might be on your list at this time of year.  I created my card box using Basic Black card stock.  The designer series paper is It’s My Party Designer Series Paper Stack from last year.  The Banner Framelits were used to add some interest.  A large faceted button was threaded with Mint Macaron and Black baker’s twine and a bow was tied.  It was added to the banner with glue dots.

To make my cards I used Basic Black,  Tip Top Taupe, and Whisper White for the card bases.  I used the Go Wild Designer Series paper stack for the patterned paper.  I kept the design simple to make them appeal to everyone.  I used a variety of sentiments to add to the front of my card.  These were punched with punches I had or I just rounded the corners.  Some of the cards have a matching ribbon and some have some enamel dots added.  A cute set that would make a great gift!

Gracie made a great set with some soft colors-


I received a coloring card sentiment set for my birthday.  Absolutely love it!  Was the best thing to make a card set to give as a gift!  They are colored with Spectrum Noir pencils (they have very soft lead and work best with a Spectrum Noir pencil sharpener). ~ Gracie 


Now Denise makes a set of color-your-own cards-


I decided to make some cards for those who were into the adult coloring craze.  This way they could have cards to send and by coloring, give them their own touch before sending them on their way.  I just took plain white cards and stamped with Versafine Ink.  I did use some heat embossing powder on a couple of them to see if it would be easier for the person doing the coloring. I tried to choose images that would give them lots to color.  The stamps included Stampin' Up -Swallowtail; Unity - Midnight Kisses; Club Scrap - Stamping Star; and Unity - Pretty as a Peacock.  To make it even quicker, I just tied the cards and envelopes with a ribbon and added some markers tied up with the same ribbon. This was super quick and I thought they came out great. - Denise

Next up is Theresa 

If you get lost along the way, here is the entire lineup:
Card A Day Challenge blog ~ http://cardadaychallenge.blogspot.com/

C.A.S.E A Card Friday #44-2016

Today's C.A.S.E.

Tantalaya provides some shimmer for wonderful Christmas card.


In this one I wanted to turn it into a Christmas card. So I took Tumbled Glass, Broken China, and Mermaid Lagoon distress inks and colored a 4 1/4 x 5 1/2 white card stock. I then took a falling snow stencil and using Simon Says Stamp white ink and using a sponge I applied it to the card stock and then let it dry. I then took the stencil and shifted so I could create more snowfall but after sponge the white craft ink I took white embossing powder to it . Creating my version of the technique the cased card had. I then used a piece of lace instead of what looked like washi to me, but still added the sentiment in the same area. Instead of using sequins I took the Nuvo drops out again this time in Ivory Seashell for the added bling to the card. - Tantalaya

Now Gracie takes a turn and flips the card-


I decided to turn my card landscape.  I dug out the water colors for this card using 2 blues and 2 purples. After letting the panel dry for awhile I embossed it with a Tim Holtz folder with twigs.  I die cut some snowflakes for a border.  The sentiment is from WPLUS9  "Christmas  Greetings ".  I stamped it with Versa Mark ink and embossed with Stampin' Up Gold embossing powder.  I added some rhinestones.   ~Gracie  

C.A.S.E.'ing a card is a great way to jump start you when the ideas slow down, so try this one today. - Denise


Thursday, December 15, 2016

Technique Thursday #44-2016

The designer's pick their favorite technique from the last year of challenges. Let's see what Gracie chose.


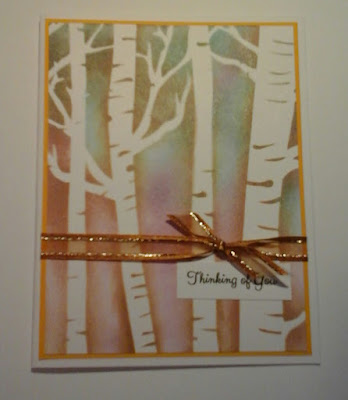
- I got to choose my favorite technique  from this year.  I haven't used stencils until this year and I haven't used Perfect  Pearls but I love the creativity they allow.  Love, love, love distress inks and they are perfect with Perfect  Pearls  and  stencils ! .  I used Black Soot, Tea Dye, Salty Ocean, and Seedless Preserves.  The stencil is from Clear Scraps.  I also used silver Perfect Pearls .   I mounted the panel on yellow  card  stock  and added a gold ribbon and a sentiment  I printed  on  my  computer .  I love the shimmer and the subtle colors! ~Gracie  

Tantalaya also used Perfect Pearls with her technique.


I love the technique from Jennifer McGuire that created the faux metal tech. So I colored and square section of my gray paper in three blues from Ranger distress inks. once the coloring was done I took my snowflake embossing folder and ran it through my Cuddle bug. Once that step is complete I took my perfect pearls powder and ran it over the colored area to create this look. Thanks Jennifer for always inspiring us - Robbie

Feel free to search for the various techniques we used over this year and choose your favorite to make your own special card. - Denise


Wednesday, December 14, 2016

Card Sketch Wednesday #44-2016

Here is the sketch for today - 

Tantalaya starts with a wonderful mix of patterns-


For this sketch challenge I used Couture Creations Vintage Rose Collection 6x6 pad. This was a fun and interesting sketch. After the sketch its self was put together I add the Nuvo Crystal Drops in pale gold. I added it to the pattern paper and to the stamped image as well....taking this card up a notch and yet it's still simple too. - Tantalaya

Gracie made another wonderful Christmas card.


I love card sketches (love page layouts too).  I started with a black card stock  base and used a Christmas paper pad to find 2 coordinating  colors.  I colored my poinsettia with my Spectrum Noir markers  - I actually used coral and red on the flowers.  I printed the sentiment on my computer. I colored the berries a very light yellow and added Wink of Stella. ~  Gracie  

Take the sketch and make it your own.- Denise


Tuesday, December 13, 2016

Color Challenge Tuesday #44-2016

The color inspiration for today gave both of our designers some challenging moments, but they both rose to meet it- 


Gracie makes us all feel better with this cutie.


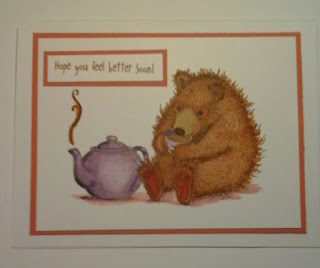
I struggled with this challenge  and I don't  know  why!  I tried my distress  inks and I wasn't  happy.  Tried water colors. Nope.  Finally gave up and got out my Spectrum  Noir  markers.  I love the little fat bear.  He came in an image Swap so I don't  know  the source .   Yep, mounted him on my coral card stock  and used a white card base.  Next year I will make myself pick a new favorite  color! ~ Gracie  

Now let's see what Tantalaya did -


Color challenge was a big challenge for me this go round. However I finally decided  to use the reds and pinks in the layers, matting them on black card stock. I then stamped the focal piece in Simon Says Stamp blue violet dye ink. I then colored in the berries and the center of some of the flowers with the Spectrum Noir glitter marker Red Berry for added shine. To finish this card off I added sequins for an added pop. - Tantalaya

Great job Gracie & Tantalaya.  Try the challenges even if it is a little out of your normal comfort zone. - Denise


Monday, December 12, 2016

Mistletoe Monday #44-2016

As we get in the full swing of the Holiday Season, anything goes!

Tantalaya went with a beautiful blue theme.


I love blue for Christmas cards so of course I had to go blue for this challenge.  I used the tree and baubles from Neat and Tangle that was in last year’s Christmas Stamp of Approval box. I then added bling all over the card....I might have gone a bit over board but I love the color combo and wanted it to sparkle and then I tied it off with ribbon with a simple knot. - Tantalaya

Gracie takes us all the way to New Year.


Anything goes -I decided to go with Happy New  Year !  The image is a Dearie Dolls digital image.  I colored it with Spectrum  Noir  markers  and used my favorite  coral card stock.  The sentiment was printed  on  my  computer .   I decided to make an easel card with white card stock .   I added a few rhinestones  to make it festive.  ~  Gracie  

Get inspired by these two great cards and let your imagination flow for your Holiday cards. - Denise


Sunday, December 11, 2016

Clean and Simple Sunday #44-2016

Time for Clean & Simple using a colored card base (no white, cream, or kraft).

Gracie gives us this charming card -


Colored card base!  I needed a card for a grandmother  who has 5 grandsons and finally has a granddaughter .   She is over the moon happy.  I started with  a  pink card base and used a black and white antique image.  I colored it with pale pink, light coral light yellow and light brown  Spectrum  Noir  markers.I covered the image with vellum and tied it with a bow.  I hope she likes it! ~ Gracie  

Tantalaya also charms with this card -


I started with a green Card base and I used pattern paper from Jen Hadfield "Warm & Cozy". On the background I used the Nuvo Mousse fresh copper with a stencil. and then I took a little bit on my finger and brought some of the color edges of the card stock keeping it simple with a big impact. - Tantalaya


So break out of the white/cream rut and try a colored card base today. - Denise