Monday, September 30, 2019

Mistletoe Monday 39-2019

Do y'all realize how quickly Christmas is creeping up???  My grandchildren are already making lists for me lol!  Today we are making a Christmas or Holiday card.

Here is my card:


I did something a little different for me and went with a 5 1/2 x 5 1/2 inch black card base.  I tried to use our Fall color scheme and found this pretty pine cone paper in my stash along with a red plaid.  The wreath, bow and sentiment are from Raisin Boat stamps and I used Northern Pine Memento ink for the wreath.  The berries, bow and sentiment are Love Letters Memento ink.  I added a piece of red tulle folded in half and hot glued it to the panel.  I added the wreath and sentiment with foam tape.  I then added Crystal Effects drops to the red berries on the wreath and on the pine cone paper.  I added a green panel inside for the sentiment.  I think it turned out pretty festive!  ~  Gracie

Sunday, September 29, 2019

Sweet & Simple Sunday 39-2019

Hello and Happy Fall, Y'all!  It's Gracie here as your designer this week and we will be working with Fall Colors (Rust, Orange, Brown and Red) and our theme for October is Fall Everywhere.  Just to let you know in advance - Fall Everywhere pretty much turned into Thanksgiving!  We are starting off today with a Sweet and Simple Card:


My card started with an embossed card (I received it from a friend so I do not know the source).  It was brown - perfect!  I highlighted the embossing with a little bit of Antique Photo Distress Oxide ink and added a strip of fall leaves ribbon.  The stamped image of the pumpkins was also a gift.  I colored the image using Spectrum Noir markers and trimmed it down and placed it on a mat of burnt orange card stock.  I attached it to the card base using foam tape.  Sweet & Simple!!  ~  Gracie

Saturday, September 21, 2019

Stand Out Saturday 37-2019

Standout Saturday is the day we make cards that are 3-D. 


I used an svg file from svgcuts.com to make this off-road vehicle. Mary is so creative making these files and I especially love her box cards.  I cut out the shapes on my Cricut Explore using blue and black cardstock. The wheels were cut using Tim Holtz metallic cardstock.  Silver brads on the wheels, along with self-adhesive jewels as the headlights and tail lights gave it added dimension. You should try these sometime as they are easier to do than they look.  Below is the card folded and ready to put in an envelope. - Denise


Friday, September 20, 2019

Color Me Friday 37-2019

The colors for this month are gray, blue and silver (or white).


A couple of months ago my brother asked me to make some of his long sleeve shirts into short sleeves because they had a tear in one of the arms (caused by his desk at work).  After I cut them off, I hated to just throw away that part since the material was still good and I love plaids.  This is a piece of the cloth from one of the sleeves that fit the colors this month.  I cut a rectangle and fringed the edges. Strong double sided tape kept it attached to the front of a card base.  I stamped an image from Unity called Roger Guy on cork paper that I had and a sentiment from MSE called Birthday Innies and Outies. I used a set of nested dies I have to cut them out and used foam tape to pop them up over the material. I will get several cards out of those sleeves and am figuring out how to use the cuff in a design. - Denise

Thursday, September 19, 2019

Inspiration Thursday 37-2019

Today we have this inspiration board.


Using a Darice embossing folder that I have had for a while I made this card.


I started with Tim Holtz metallic paper and ran it through my Cuttlebug with the embossing folder.  I then used a black Gilder's Paste to rub over it. I stamped a piece of velum with Versafine and used clear embossing powder to really make it stand out.  I use embossing powder quite a bit on velum since the ink can't smear if you do. I placed it over the front using thin strips of double-sided tape at the top and bottom. That was all mounted on a black card base. - Denise

Wednesday, September 18, 2019

Sketch Wednesday 37-2019

Here is the sketch we have for today's cards.


I did two cards using the same paper pack from Authentique called Seafarer.  


These were quick to do and I set up circles on my cricut and also made three slightly bigger circles to cut a mat in dark blue for each of the patterns. The strips came from the same paper pack and I stamped a quick Thank You from a CTMH  set called Perfect Fit Thanksgiving. - Denise


Tuesday, September 17, 2019

Technique Tuesday 37-2019

The technique for Tuesdays this month is metal looking paper. A tutorial can be found here.


I experimented and did a couple of different cards. Both started with silver metallic paper from Tim Holtz.  The compass is is a Darice embossing folder while the right card uses a Sizzix folder called Foundry.  I mist the back of the paper before sending through my Cuttlebug to emboss and it really helps to make a nice result.  For the compass I used a new product I picked up called Gilders Paste wax in white.  I ended up wiping most of it off and it left a subtle glaze effect all over with more white in the crevices. I wanted to try and make some rusty spots on the right card so I put on a pair of disposable gloves and after dipped my finger in Gamsol then in the same Gilders Paste Wax but in rust.  I dabbed at various places.  I went over them several times until I felt it looked rusty enough. Both sentiments were stamped on black paper and heat embossed using platinum embossing paper.  The journey sentiment is from Club Scrap and the right is from Gina Marie. I mounted both on a black card base.  I think guys would like these. - Denise

Monday, September 16, 2019

Mistletoe Monday 37-2019

Using the colors for this month's challenge of blue and silver (or white) I experimented and made four cards


I started by embossing four blue panels with a Cuttlebug embossing folder by Anna Griffin called Snow Flurry.  The experimentation came by using various things to color the raised dots.  The top left card used Liquid Pearls while the top right used Wink of Stella. The Wink of Stella is more subtle but does show a little better in real life.  Viva 3-D Stamp Paint in silver was used on the bottom left and was applied using a small paint brush. The bottom right used a Bistro Chalk marker. I used a silver paper to mat all of the panels and the various sentiments which were stamped on the same blue card stock and embossed with platinum embossing powder.  - Denise 

Sunday, September 15, 2019

Sweet & Simple Sunday 37-2019

Hi all, it's Denise for my week in September.  I started with a very quick and simple card for the September theme of masculine cards.


I started with a Kraft colored card base and stamped the image from CTMH called Blue Jeans using using Distress Oxide ink called (what else) Faded Jeans.  Using a stitched pattern from the same stamp set I tried to use a white pigment ink.  It picked up part of the blue and wasn't as white as I would have liked even with multiple stampings, but I just went with it. The birthday sentiment was from CTMH Hats off and the bottom sentiment was from Unity called Consider Yourself Classic.  I think masculine cards are better with simple. - Denise

Saturday, September 14, 2019

Stand Out Saturday 36-2019

Happy Saturday!  Hope you are enjoying your weekend!  Today the challenge is to make a stand out card - I chose to make a bendy card!


My card base is a Silhouette file and I went through my stash and found some blue patterned paper (I think it is Creative Memories from WAY back in the day!) and covered each of the panels.  The die cuts were all print and cut files purchased from Miss Kate Cuttables.  After I printed them using the Silhouette print feature I cut them out and popped them on with Art Glitter Glue.  The sentiment was printed on my computer.  I love how it stands out but can fold flat for mailing!

I have had so much fun making masculine cards (even if they are quite plain) and I hope you have been encouraged to build up your masculine card stash!  I will see you again next month! ~ Gracie

Friday, September 13, 2019

Color Me Friday 36-2019

It's Friday and time to play with color!!  Our colors this week are gray, blue, silver and white.

Here is my card:


This card started with a stamped image I received in a swap so I do not know the source but it sure is masculine!  I colored it with Spectrum Noir markers and fussy cut it.  I die cut a circle of white using a stiched circle and attached the car with foam tape.  I cut a panel of gray patterned tire tracks card stock and placed the circle on it.  I printed my sentiment on my computer using blue ink, trimmed it and sponged it using "Faded Jeans" Distress Oxide ink and sponged the edges of the panel as well.  I placed the panel on navy blue card stock and used white card stock as a card base.  ~  Gracie

Thursday, September 12, 2019

Inspiration Thursday 36-2019

Happy Thursday!  How about a mood board for a little inspiration today?


Here is my card:


I started the card with a sentiment printed on my computer, trimmed and sponged with "Antique Photo" Distress Ink.  I attached it to a strip of brown card stock with a vintage look.  I found a piece of gray card stock in my stash and cut a panel and placed it on gold card stock.  I used white card stock as a card base.  The fan die cut is a Silhouette file cut using pearl glimmer card stock and dark gray card stock and sponged with the ink.  I placed a silver brad in the center of the fan.  The fan was placed on the card using foam tape.  ~  Gracie

Wednesday, September 11, 2019

Sketch Wednesday 36-2019

It's Wednesday and we have a sketch for inspiration!


And here is my card:


This card was fun.  I stared with 3 stamp sets - The sentiment is from Our Daily Bread, the ship is Deep Red, and the arrows are unbranded.  I stamped the images on white card stock with Tuxedo Black Memento ink.  I die cut the images into 3 different sized circles then roughed the edges with scissors.  I then inked the edges and images with "Faded Jeans" Distress Oxide ink.  I placed the circles on dark pearl gray card stock.  I placed a strip of blue crackle card stock between the circles and hot glued a cross with a bit of twine on the strip.  I placed the panel on a white card stock base.  ~  Gracie

Tuesday, September 10, 2019

Technique Tuesday 36-2019

Happy Tuesday!  Time to play with a video!  Here is the link:


And here is my card:


This is a really easy technique!  i started with a panel of silver card stock and lightly spritzed the back with water (to keep it from creasing) and ran it through the Big Shot using a Darice embossing folder.  I then added black acrylic paint (a little goes a long way and this step is messy - grab the paper towels!) and wiped off the excess leaving the paint in the grooves.  i trimmed the panel down and placed it on a panel of gray patterned card stock then on a panel of blue card stock.  I used white card stock for the base.  I printed the sentiment on my computer, trimmed it and sponged the edges with "Faded Jeans" Distress Oxide ink.  I placed the sentiment on the same patterned gray card stock and attached it with foam tape.  Easy peasy!!!  ~  Gracie

Monday, September 9, 2019

Mistletoe Monday 36-2019

Hello and Happy Monday!  Christmas is getting closer and closer!  Time to make a Christmas or Holiday card!

Here is my card:


OK - confession - I am simply not that good with masculine cards!  I tend to just make them simple!  That's what I did today.  I started with a stamp set from Raisin Boat.  I stamped the image and sentiment on gray card stock with Memento Luxe Tuxedo Black ink and heat embossed with clear Whispers embossing powder.  I trimmed the panel and attached it to a panel of light blue card stock.  I placed them on a white card base.  I added Nuvo Morning Dew Crystal Drops for accent to resemble snow.  ~  Gracie

Sunday, September 8, 2019

Sweet & Simple Sunday 36-2019

Hello again and Happy Sunday!  It's Gracie again this week as your designer.  This week we are making cards with a "Masculine" theme and our colors are gray, blue, silver and white.  Let's get started with a Sweet & Simple card!

Here is my card:


This one was really simple!  I started with a white cardstock base and added a dark gray "crackle" card stock panel.  I cut a strip of another textured grey card stock and placed it on the panel with Art Glitter Glue.  I printed the sentiment on my computer with black ink.  I attached it to the strip with foam tape.  I added a single leaf die cut from Recollections and a jute bow.  Done!  ~  Gracie 

Saturday, September 7, 2019

Stand Out Saturday 35-2019

It's Saturday and time to make a card that stands out or up - just different than a normal card!  Today I chose to make a pull up card!

Here is my card:


This is really different but really easy.  You basically make a card that is like a pocket and when you open it the flap pulls up to reveal your message.

I started with white card stock as a base a die cut the top edge then folded down to make a flap..  The card is folded at the bottom and glued with Art Glitter Glue on the sides making the pocket.  A second piece of white card stock is folded and attached to the top flap at the fold.  I covered the inside panel with gray patterned card stock and attached a white panel to write the greeting.  The outside top flap is covered with the same gray patterned paper.  The lower flap (pocket) is covered with another patterned paper.  I printed the sentiment on white card stock and attached it with Art Glitter Glue.  I had a Tim Holtz buckle hardware in my stash that I attached with a brad.  I think it made a fun card for a guy!

I had fun this week!  I will be back next week for more masculine cards!  ~  Gracie

Friday, September 6, 2019

Color Me Friday 35-2019

Hello again and Happy Friday!  Today we are working with our colors and this month they are gray, blue, silver and white.  Our theme is Masculine.

Here is my card:


I started today's card with a stamp from Sum More Fun using Tuxedo Black Memento ink.  I colored the image with a light gray Spectrum Noir marker.  After coloring, I masked the image with an oval die cut and sponged "Faded Jeans" and "Broken China" Distress Oxide inks and lightly spritzed with water.  I removed the die cut after the panel dried and trimmed it and placed it on a white panel, then placed it on another turquoise blue panel.  I attached it to a white card stock base.  I printed the sentiment on my computer and placed it on a strip of the turquoise blue card stock and attached it with foam tape.  ~  Gracie

Thursday, September 5, 2019

Inspiration Thursday 35-2019

It's Thursday and time for a mood board!


And here is my card:


I know I am quirky when I look at this mood board and see a watch and think of old!  I started my card with a stamp set from Art Impressions.  I stamped the image on white card stock and colored it with Spectrum Noir markers.  I fussy cut the image and inked the edges with "Antique Photo" Distress Ink.  I attached him to a panel of gray patterned card stock with foam tape.  I printed the sentiment on my computer and trimmed it and inked the edges with the "Antique Photo".  I placed the sentiment on a panel of patterned gray card stock.  I inked the edges of the panel, as well.  I attached the image panel and placed both on a panel of black card stock.  i used white card stock as my card base.  ~  Gracie

Wednesday, September 4, 2019

Sketch It Wednesday 35-2019

It's Wednesday and time for a sketch:


And here is my card:


I started my card with a wonderful textured gray card stock and trimmed it into a panel.  I attached it to a panel of pale blue card stock and used white card stock as my card base.  I found some die cuts in my stash from Hot Off The Press.  I trimmed 2 strips of card stock and placed them over the largest die cut then placed the two smaller over the strips.  I printed the sentiment on my computer and trimmed it and sponged the edges with "Antique Photo" Distress Ink.  Simple and masculine!  ~  Gracie
Tuesday, September 3, 2019

Technique Tuesday 35-2019

It's Tuesday and time to play with a technique!  Today we have a YouTube video to create metal looking paper.

Here is the link:


And here is my card:


I started with silver card stock and lightly spritzed the back with water (it really does keep the card stock from creasing!)  I used a Sizzix embossing folder.  After embossing, I applied black acrylic paint (get the paper towels because it gets really messy!)  I think I removed to much of the black paint but it looks better in person...  I trimmed the panel down and placed it on a royal blue panel and used a white card stock base.  I used a die cut for the sentiment and placed it on a strip of the blue card stock and attached it with a strip of foam tape.  Done!  ~  Gracie

Monday, September 2, 2019

Mistletoe Monday 35-2019

Hello again and Happy Labor Day!  It's also Monday so let's make a Christmas or Holiday card!  Our colors are gray, blue, silver and white.

Here is my card:


I decided to go with gray since I was trying to make my card masculine.  I found a lovely gray snowflake pattern paper in my stash.  I trimmed a panel for the front of the card, then cut it on a diagonal, leaving a strip to place my sentiment.  I lightly tacked the panel pieces on my card and placed the card in my MISTI.  I stamped the sentiment in the strip area with gray Memento ink.  I also stamped the bird with the same gray ink and fussy cut the image (the stamp set is from Hot Off The Press).  I attached the patterned panel pieces with foam tape and attached the bird with foam tape.  ~  Gracie

Sunday, September 1, 2019

Sweet & Simple Sunday 35-2019

Hello, y'all!  Happy September!!!  It's Gracie here this week as your designer.  If you are anything like me, you have a ton of feminine cards and few masculine!  We are going to remedy that this week!  Out theme is Masculine and our colors are gray, blue, silver and white.  Today we are making a sweet and simple card.

Here is my card:


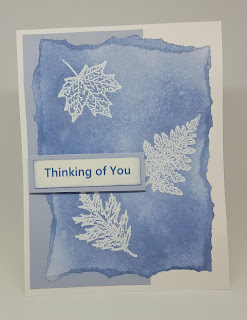
I started my card with a stamp set (it's out of the package - I can't remember who made it!) with leaves.  I stamped the leaves on white card stock with clear Versamark ink and embossed with white embossing powder.  I tore the edges of the panel then sponged "Faded Jeans" Distress Oxide ink.  I lightly spritzed with water and set it aside to dry.  I trimmed a panel of gray card stock and attached it to a white card stock base.  I printed a sentiment on my computer with blue ink.  I trimmed the sentiment and placed it on a strip of the gray card stock.  After the leaf panel dried I placed it over the gray card stock and adhered it with Art Glitter Glue.  I attached the sentiment with foam tape.  Sweet and simple!  ~  Gracie