Wednesday, January 31, 2018

Four Designer Challenge: January Day 3

There's not a daily challenge, but instead four designers were given the same products.
We each picked some to play with for the week.

Today is Anna's pick.


We will each use that product in our cards along with other stuff
from our stashes to create cards.

I picked a black tag out of my envelope. I also had some napkins in the envelope. I had never done the napkin technique so I hit up Youtube (where would we be without that!?) 
I decided on the easiest one.  I ran the card through my large Xyron, pulled the backing off and then carefully laid the layer of napkin on it.  There were a few wrinkles... Then I used my versamark and stamped it all over, after that I doused it with embossing powder "Bridal" from Personal Stamp Exchange.  I'm most excited about the tag. I decided to use my Chalk Couture and a couple of transfers from "Candy Hearts".  Chalk Couture is my newest craft and it is so much fun to use and literally anyone can use it.  Here is a link to youtube videos so you can see what it is all about. ~Anna


I used another of the pre-printed Paper Studio Cardbases. I stamped the sentiment in VersaMark and embossed with Brutus Monroe Alabaster Embossing Powder. 
I then stamped the world map stamp (sorry I don't know the manufacturer, it's really quite old) 
in VersaMark and used Perfect Pearls to brush over it.
I used a red heart brad from my stash in the hole. 
Again it's a clean and simple card, but that's how I roll...LOL. ~ Theresa


For my card, I chose to go rather "elegant" with my design. I heat embossed using silver embossing powder the sentiment from Paper Smooches' Saluations stamp set.  I added some silver ridged washi tape to frame the sentiment. I found some silver ribbon for the tie of the tag. For the background, I found some old Creative Memories paper from the Wishes and Dreams pack, which had some shiny silver stars on it. Here's my card ~Sue


I stamped the tag with a Hampton Arts stamp "Sending Love" using clear Versamark ink and copper embossing powder.  I tied the tag with a bit of twine.  I used a pale peach card stock base and added some Paper Studio Mixed Media flowers and buttons. ~Gracie


Stop in tomorrow to see Theresa's product pick and all the cards.

Happy Crafting 
Theresa, Gracie, Sue & Anna

Tuesday, January 30, 2018

Four Designer Challenge: January Day 2

There's not a daily challenge, but instead four designers were given the same products.
We each picked some to play with for the week.

Today is Sue's pick.


Now on with the creations...


For this card, I stamped on the printed tag using Paper Smooches' Reflections stamp set and Hero Arts Field Greens and Soft Cantaloupe inks. For the sentiment, I die cut using MFT Die-namics Happy Hellos dies and a scrap of black cardstock. For a bit of sparkle, I added some Wink of Stella to the sentiment. I found some orange printed paper that I thought made the card "pop". Here's my card. ~Sue


Make a card with the newsprint tag. This was super easy. I just added the tag to  bright pink card stock and then added a cute little shaker heart from the Mark Richards collection  ~Anna


I had fun with Sue's tag!  I got out some Faber-Castell Glass Bead Glitter Gel and gelatos.  I mixed a very tiny amount of pink with a small amount of the gel and used a heart die to place the beads on the tag.  It takes quite awhile to dry but it really pretty.  The tag had a white bit of twine; I removed it and added a turquoise ribbon.  I placed the tag on some Stampin' Up card stock from "Cupcakes and Carousels".  I used a light turquoise for a card base.  I still needed something so I went through my stash and found 3 flowers from Recollections.  I die cut the sentiment with black card stock and added black flat back pearls.  I really liked how this card turned out. ~Gracie


For my card, I stamped the tag with love xoxo from Fiskars Theresa Collins Handwritten set 
and a few hearts from Love is in the Air set by Catherine Pooler (Stamp of Approval) 
using VersaFine Onyx Black Ink and Catherine Pooler Rockin Red Ink.
I attached the tag to a Paper Studio (Hobby Lobby's brand) pre-printed card base.
It's simple but I like how it turned out. ~Theresa


Stop in tomorrow to see Anna's product pick and all the cards.

Happy Crafting 
Theresa, Gracie, Sue & Anna

Monday, January 29, 2018

Four Designers Challenge: January Day 1

As we said in yesterday days post, this week is very different.
There's not a daily challenge, but instead four designers were given the same products.
We each picked some to play with for the week.

Today is Gracie's pick.  This is what she chose.
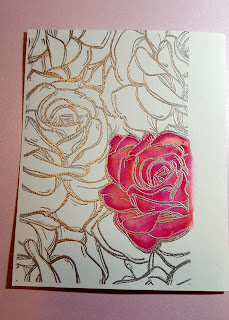
It's a card front that I created and colored one flower on and then never turned into cards.


We will each use that product in our cards along with other stuff
from our stashes to create cards.

There are no other rules. 

Now on to the creations...


Wow.  This was fun!  
Theresa sent us all envelopes with items to make cards. 
It took me several times asking questions to figure out what I needed to do!  
We each had to choose an item to make a card and also make a card using the same item other designers picked AND two items from Theresa's envelope to make two more cards! 


I chose to color it with my Spectrum Noir Markers and add Clear Wink of Stella to each of the roses.


I trimmed the panel and mounted it on black card stock and used the same black card stock to die cut the sentiment.  I added some black enamel dots.I used a pale lavender card stock base.  I think the black really brings out the silver embossing.  ~ Gracie

This was a fun challenge. It really pushed me to be creative.


I trimmed the panel and added a orange/yellow background. I looked around for a sentiment and decided upon the Clearly Besotted Flowers and Flourishes stamp set. Here's my clean and simple card. ~ Sue


Greetings!! I haven't made a card for a blog in almost 2 years! 

Silly me I thought it would be like riding a bike... WRONG... First I ruined the embossed flower part of the card.. so I tried fixing it. 


That made it look a little better .. then I got the bright idea to cover it with velum because if something is awful cover it in velum! I then added an embossed tag with a stamp from Bible Journaling brand stamps. ~Anna


And last but not least is my card...


I diecut the panel using the Lattice Frame die by Catherine Pooler Designs (Stamp of Approval.)  I used some pink cardstock that I'd had in my stash (12 x12 from my scrapbooking days) for years to make the card base and to diecut the Hello die by Paper Smooches several times.  I ran them through my Xyron X Stickermaker and stacked them up, adding Spectrum Noir Sparkle Pen to the top layer. ~Theresa


We hope you enjoy this challenge as much as we did (after we all got on the same page LOL.)
See you tomorrow for Sue's product pick.

Happy Crafting 
Theresa, Gracie, Sue & Anna

Saturday, January 27, 2018

Scene it Saturday - 04-2018

Scene it Saturday


I have a supply of cute brads and washi tape that I never seem to use, so this card made good use of both.  I choose these cute penguins from Eyelet Outlet (I thought about adding the cute Polar Bears that were also in the package, but realized that they eat penguins, so I thought the better of it).  The igloo as made with white cardstock, silver cardstock and black vinyl on my Cricut Explore using they cartridge Go Canada. I then used two stitched edge dies to make the hills and edged those with blue Distress Ink.  I cut a piece of silver washi tape and stamped the sentiment in Stazon Ink.  I used a DVD case as a stamping platform so I could stamp it more than once until it was nice and dark.  I decided after putting it on, that putting an edge of the washi all around would help tie it together.  It was such a thin border that I did use glue to help it stay down.  - Denise

Friday, January 26, 2018

Freestyle Friday - 04-2018

Freestyle Friday


I make birthday cards for my church family and this year I decided to make the same type of card for everyone, but use various stamps for different people.  I recently had an a couple of Lutheran Hymnals from the 1950's and 60's left to me, so I decided to use one as part of my cards.  It is the hymnal I grew up with, so it is fun to look through it and remember.  I tore out one of the pages and tore around the music part.  I stamped this angel from Unity called Maria Girl in Versamark and then water colored her with Distress Ink and a water brush.  The pages, while thin accept the water color pretty well. I went around the outside of her with a light gray to set her off a little more. This was then taped to a patterned paper by SCWV (The Christmas Combo).  The sentiment was printed on my computer and nesting dies were used to cut it and the mat out. - Denise

Thursday, January 25, 2018

Thursday in 3D - 04-2018

Thursday in 3D


 Side vier


I had already decided to make box cards for my family this year so this challenge was perfect to make my first of 2018.  I used my Cricut Explore to make a cut from SVGcuts.com set called Garden Party. I used cardstock from a DCWV stack called Christmas Plaid.  The flowers were cut from red and green cardstock and in place of one of the flowers, I used a cardinal  and pine branches fussy cut from another page of the stack.  I will add the sentiment to the back of the cup.  I did use Distress ink on the edges of the flowers and bird and shaped the flowers with tools from Heartfelt Creations to make them even more 3-D. - Denise
.
 .

Wednesday, January 24, 2018

WOW Wednesday - 04-2018

Wow Wednesday

The challenge today was to take a card that we had previously made and turn it up by adding sparkle or shine.


I messed up by not taking a picture of this card in its original form, since I was positive I had one.  The original did not have the sequins or the shine on the heart.  I stamped and embossed the image and sentiment from a Unity set called Caffeinated Love and colored them with alcohol inks and used Distress ink around the edges.  To jazz it up, I added Wink of Stella on the heart and some sequins.  It is hard for me to do more that that because I tend to like clean and simple or distressed cards, not sparkly, but a little sparkle does add a nice touch. - Denise


Tuesday, January 23, 2018

Technique Tuesday - 04-2018

Technique Tuesday


The technique for January is to use colored pencil on dark or Kraft Cardstock.  I really like working with Kraft paper, so I stamped this snowman from Unity's Winter Blessings and colored it with Prismacolor pencils.  For some reason, my white pencil is missing, so I used my water color pencil instead.  A little blue and silver on the hat and scarf completed it.  I cut out the panel using a new nesting die I got from Gina Marie.  It has cuts all along the edge that I decided to highlight with the white pencil.  The banner was cut from blue cardstock and I used a clear stamp from Close to my Heart (Hats Off Birthday) which I was able to bend around to follow the curve of the banner.  I went around the edge of it with the white pencil too.  The panel was then popped up on foam tape on a blue cardstock mat.  To save paper, I cut the banner out of the middle of this mat before putting the card together.  - Denise

Monday, January 22, 2018

Sweet and Simple Sunday 04-2018

This is Denise as the designer for the last week of the January with the theme of Winter Birthdays.

Sunday is Sweet and Simple


This card was super easy to make.  The cup and sentiment were stamped on white card stock with Versamark and then heat embossed with silver. Both stamps are from a Unity sentiment set called Cuppa Comfort. I fussy cut it and popped it up on foam tape and mounted it on a patterned card stock from a kit by Echo Park called Hello Winter and matted on another pattern paper from the same kit.

Inside

I added a sticker from the kit to the inside to continue the coffee theme.  A good patterned paper and heat embossing a stamp can be a quick way to get a cute card - Denise


Mistletoe Monday - 04-2018

Mistletoe Monday 

I keeping with the Winter birthday theme, I made a card for a Christmas birthday.  My Aunt Jan was born on Christmas and while she has passed away, making a special card for a Christmas birthday can still be fun.


I took a pre-printed panel from the DCWV stack called the Christmas Combo and trimmed it close to the scallop. I don't normally use my own writing, but I decided to try it with a calligraphy marker since I didn't have a stamp that I wanted.  To dress it up, I took two buttons and strung twine through them and put them over the holly on the panel.  I also cut two presents from another page of the stack and put them on foam tape.  I put the panel at an angle on plaid paper from the stack and put that on a kraft card base.  - Denise


Saturday, January 20, 2018

Scene it Saturday - 03-2018

Hi! It's the last day of my posting week. The monthly theme is Winter Birthday and today's prompt is "create a scene card".

Here's my card


I used Catherine Pooler's Winterhaven dies with printed paper to give the die cut houses added interest. I also added some Ranger texture paste which I applied to the tops of the houses to make them look snow-covered. I used the "slope" die also from the Winterhaven dies to create the slope from white cardstock. Here's a close-up of a few houses.


For the background (sky), I added distress inks (spun sugar, tumbled glass, shaded lilac) with ink blending tools. The sentiment is from Paper Smooches Salutations stamp set.

Thanks for dropping by
sue

Friday, January 19, 2018

Freestyle Friday - 03-2018

Hi! It's Sue here with another card following this month's theme of Winter Birthday. Freestyle Friday means I can make any card, I'd like.

Here's my card


.

I love snowmen. This one is from Stampin' Up's Snow Much Fun stamp set. I stamped the snowman with Memento Tuxedo Black ink and added colour with copics. I matted the panel with teal cardstock, matching the scarf, to make it pop. I looked around for a sentiment what would work and found this one, from Paper Smooches' Birthday Buddies stamp set. Clever - right?

So happy, you dropped by today. 
sue

Thursday, January 18, 2018

Thursday in 3D - 03-2018

Hi! I'm back with another card that follows this month's theme of Winter Birthdays. Today's prompt is "cards or projects that are 3D". 

I made this card


I started by die cutting three circles - approximately 1" , 2" and 3" in diameter. I inked the edges with some brown chalking ink. For the eyes, mouth and buttons, I used Simon Says STAMP Lots of Dots stamp set and black ink. I cut a small triangle from a scrap of orange cardstock for the carrot nose. For the arms, I cut out "branches" from dark gray cardstock. For the background, I started with light blue cardstock and stamped snowflakes from Simon Says STAMP Hand Lettered Winter Wishes and clear embossed them. The sentiment is from Sunny Studio's Heartfelt Wishes stamp set. When I assembled the snowman, I used dimensionals between the circles and popped the finished snowman using an Action Wobbler. 

Here's a closeup


This was the first time I've used an action wobbler. It sure makes the snowman "dance". i think that I'll be using them more often.

Thanks for stopping by
sue

Wednesday, January 17, 2018

WOW Wednesday - 03-2018

Hi! Sue back with another card following this month's theme of Winter Birthdays. For WOW Wednesday, the them is to "turn up the volume on one of my past cards". 

Here's the card, I started with


To "turn up the volume":

  • I added Wink of Stella on the flowers, leaves and frame for some shimmer;
  • I added Nuvo Glitter Drops - White Blizzard for some dimension;
  • I added rhinestones for the centre of the flowers
Here's up WOW card


Here's a close-up


Thanks for stopping by
sue

Tuesday, January 16, 2018

Technique Tuesday - 03-2018

Hi! It's Sue again here with another card following this month's theme of Winter Birthdays and for today, also following today's technique prompt of using colored pencil on dark/kraft cardstock.

Here's my card


I started with a dark blue cardstock and used Unity Stamp's Snow Way stamp set. I chose the snowman with the hat and tie. I added the balloon from Technique Tuesday's Let's Party stamp set. I colored the image with Prismacolor colored pencils. For the sentiment, I used clear embossing powder and Sunny Studio's Heartfelt Wishes stamp set.

This card is a bit difficult to photograph. Here is a close-up of the cute snowman.


Thanks for stopping by
sue

Monday, January 15, 2018

Mistletoe Monday - 03-2018

Hi! It's Sue back with another card following this month's theme - Winter Birthday, while also following today's prompt - Christmas/Holiday cards.

I chose to focus on Jesus' birthday, which I celebrate each December 25th. Here's my card


I started with Paper Smooches' A Blessed Christmas stamp set, stamping it with Memento Tuxedo Black ink. I added colour with Copics and fussy cut the image. The sentiment is from Simon Says STAMP Peace on Earth stamp set, which used silver embossing powder and was heat set. I found some shimmery patterned paper which I chose as the background for my coloured image. To complete the card, I added a silver thread nest under the coloured image, which was popped up with dimensionals.

Thanks for stopping by. 
sue

Sunday, January 14, 2018

Sweet and Simple Sunday 03-2018

Hi! It's Sue. I'm this week's designer here at Card A Day Challenge. Our monthly challenge is Winter Birthdays.

It's Sweet and SImple Sunday - where the instructions are to create a clean and simple card following the monthly challenge and using the color scheme - blue, silver and white.

Here's my card


I started with the snowflake/starburst stamp from Winnie & Walter's Scenery: Big Bang Bling stamp set. I used Versamark ink with silver embossing powder, which was heat set to start the vertical strip. I trimmed it to 2". I added distress inks (tumbled glass, salty ocean, mermaid lagoon, faded jeans) with ink blending tools in a random fashion. I matted this strip with some silver shimmer cardstock. The sentiment is from Paper Smooches' Sentiment Sampler stamp set and was also silver heat embossed.

Thanks for dropping by. See you tomorrow.
sue

Saturday, January 13, 2018

Scene It Saturday 02-2018


Winter scenes are so pretty - as long as you don't have to be out in the weather.  I, fortunately, live down South.  We rarely see a beautiful Winter scene so we get to look at calendars lol!  If we get a spit of snow the schools close, the grocery store shelves are empty, there are 900 wrecks in a day, and no salt or plows for the roads!  We will forever just be dreaming of a White Christmas!

I love today's challenge.  A winter scene for a birthday with white, blue and silver.


I die cut the "snow" using two stitched dies (from China) using Anna Griffin white glimmer card stock.  I die cut the sentiment (maybe Simon Says?) using silver glimmer card stock.  The trees are cut using a tree die (from China) and I used blue and silver glitter card stock.  I used pale blue Anna Griffin glimmer card stock for a base and added some blue enamel dots.  I would love to look out the window one day and actually see that much snow - just don't ask me to walk outside in it!  Have fun making your cards with the challenges this week! ~ Gracie

Friday, January 12, 2018

Freestyle Friday 02-2018


Oh, boy!  I can play today!!!  It's Freestyle Friday!  Again I had to decide between 2 cards so you are getting both!


This first card is perfect for a Winter birthday (both masculine and feminine).  It is simply blue shimmer Anna Griffin card stock run through the Big Shot with a Darice Snowflake folder.  I die cut the sentiment and the snowflakes with silver glimmer card stock (I do not know the manufacturer of the dies - they came from Peachy Cheap).  The card base is white glimmer card stock.  I left the inside blank.


The second card is definitely for a feminine birthday and I enjoyed every minute making it.  The image is digital and is from Sheepskin Designs (Ice Queen).  I colored her using Prismacolor pencils with three shades of blue for her hair, light brown, peach and pink for her face and blue and silver for her eyes and lips.  The stones on her crown are colored with a blue Wink of Stella glitter pen.  I printed the sentiment in a gradient blue on my computer.  The sentiment and image are mounted on royal blue card stock and placed on a light blue card base.  I went back and colored the snowflakes with a silver gel pen and added rhinestones to the centers.  Play with your colors!  We don't have to stay in the lines or color in the box! ~ Gracie

Thursday, January 11, 2018

Thursday in 3D 02-2018


Oh, my...  3D has soooo many possibilities!  I needed something to send to my sister.  She is not your everyday kind of birthday card person.  She is getting hot cocoa!  Still working with white, silver and blue today.


I started with white card stock and cut it to 4 1/2 inches by 11 inches and scored at 1 inch and 6 1/2 inches.  After scoring I adhered a packet of hot chocolate up to the top fold and used a hole punch to punch holes in the card stock and the sealed area of the packet and tied a bit of ribbon through the holes.  I used a Pink & Main stamp set "Need Coffee" and stamped the image with Tuxedo Black Memento Luxe Ink.  I colored the image with Spectrum Noir Markers and mounted it on royal blue card stock. The front tucks under the flap on top.  ~ Gracie


Wednesday, January 10, 2018

Wow Wednesday 02-2018


Time to turn up the volume!  And still use our color scheme!  I had a card I entered in a challenge that was so-so.  It was based on a card sketch (source unknown).


The card was OK - I did win a happy for it!  The sentiment on the front is from an unknown source - the inside says "Let's Celebrate!  It's Your Birthday!"  The stamp is from Technique Tuesday as well as the die cut to cut out the flower.  I cut it into thirds to mirror the sketch.

To Wow the card I removed the silver glimmer card stock strip and added glitter Washi tape.  I also added several rhinestones.  The card worked very well because I already had the colors needed.


I even added rhinestones to the sentiment inside.  It is harder than it looks to try to change a card after you have finished it! ~ Gracie

Tuesday, January 9, 2018

Technique Tuesday 02-2018


Fun today!!!  Get out either craft paper or dark paper and get ready to color!  We are still using our white, silver and blue colors.  I had so much fun with this little guy!


This precious little penguin was a freebie from Whimsey Stamps!  I printed him on brown craft paper with dark brown ink.  Then the fun started!  I colored on this little guy for probably three hours.  It takes patience to layer colors to show depth and dimension on craft paper.  I used Prismacolor pencils (the key is keeping your pencils sharp).  The balls and the bell are colored with a silver pencil.  A white pencil was used to make highlights.  I must 'fess up - I colored him the first time in red and green because I completely forgot about white, blue and silver!  The panel is mounted on a royal blue card stock base with a sentiment on the inside "Have a Holly Jolly Birthday" I printed on my computer.  Dig out those pencils and have fun! ~ Gracie

Monday, January 8, 2018

Mistletoe Monday 02-2018


I love Christmas.  Did I say I love Christmas?  My tree is still up.  It will be up until my daughter tells me enough is enough (of course she puts hers up on November 1 and tries to come help me get mine up by then).  I love making Christmas cards!  Again the color scheme is white, silver and blue.


I love glitter and bling!!!  I started today's card with a stamped image (source unknown - it was sent to me in a swap).  I colored the image with three shades of brown Prismacolor pencils.  I used a blue Wink of Stella pen to color the snowflakes around the antlers.  I oval cut the image and oval cut a larger area on the blue glitter card stock.  I backed the glitter card stock with silver glimmer card stock and centered and adhered the image with pop dots.  The sentiment was also received in a swap.  I added silver enamel dots.  The panel was mounted on a white card stock base.  Start on your Christmas cards now!  In 52 weeks you will have plenty to send! ~ Gracie

Sunday, January 7, 2018

Clean and Simple Sunday 02-2018


Wow.  Seems like last year just flew by and where did the holidays go?  It's Gracie here for this week!  This week will still keep me in the Holiday Spirit - it is a Winter Birthday theme!  I had a hard time deciding which card to use after making several so today you get two!


Our color theme this month is white, blue and silver.  Perfect Winter colors!  I chose two digital images (the first is from Sasayaki Glitter "Winter Peggy"; the second is from Moonflower Lilly on Skates).  They are both colored using Prismacolor pencils.

On the first card I die cut the snow edge ( I'm sorry I am unsure of the source) and attached it to silver glimmer Anna Griffin card stock.  I attached the image and the snowflake edge to a lighter blue glimmer Anna Griffin card stock and a light blue card stock base.  I printed the sentiment from my computer.

On the second card the image is printed on white card stock and she also is colored with Prismacolor pencils.  I mounted the white panel and the sentiment (also printed on my computer) on light blue glimmer Anna Griffin card stock and made the card into an easel.  These were so enjoyable to make (I love to color!)

I have two January birthdays these will be mailed to! ~ Gracie

Saturday, January 6, 2018

Scene it Saturday

This Month's Theme:  Winter Birthdays

Today's Prompt:  Create a scene card.


Today's card features Wendy Vecchi products. I enjoyed learning these techniqes while attending a Wendy Vecchi class at a retailers only trade show. The Card Base is Ranger's Specialty Stamping Paper.  I swiped the c/b through a puddle of reinker mixed with rubbing alcohol. (Wendy Vecchi's technique) and dried with a heat tool.  Then I applied Garden Patina Archival ink through two WV stencils to create the "snow falling" in the background.  The tree and gift is also a WV stencil set.  The gift is Garden Patina Archival Ink and the tree is Fern Green Ink.  The top layered tree is a WV mat mini, colored with Fern Green Archival ink and the design is stamped with Watering Can Archival Ink.  I created the Poinsetta Leaf in the same manner as the tree.The red ink is Carnation Red.  I finished off the card with Ranger Enamal Accents and Wink of Stella (trees and leaves).  

Friday, January 5, 2018

Freestyle Friday

This Month's Theme:  Winter Birthdays

Today's Prompt:  Create any card


I created today's card with Wendy Vecchi and Ranger Products.  The card base is Ranger's Heavy Mixed Media C/S.  I stamped the background stamp with Black Archival Ink.  Next, I applied Sky Blue Archival Ink through a Wendy Vecchi stencil.  The leaves are WV Mat Mini's, inked with Leaf Green Archival Ink.  I used a background stamp inked with Black Archival to create the design on the leaves.  The sentiment is also a WV Stencil, inked with Red Carnation Archival Ink.  I finished the card with WV Enamel Accents in Garden Patina and Red Carnation. - Kimberly

Thursday, January 4, 2018

Thursday In 3D

Monthly Theme:  Winter Birthdays

Today's Prompt:  Cards or projects that are 3D


Today's card is a "card in a box".  These cards are easy and fun to create.  The Paper Cut offers 5 count card base kits to work with.  The bases are pre-cut and scored.  Basically all you need to do is put it together and decorate.  The patterned paper is from Tim Holtz's 8" x 8" Christmas Paper Pad.  The embellishments inside the card are items I pulled from my stash.  I am thinking of adding a gift card when I find the perfect reciepient.  - Kimberly

Wednesday, January 3, 2018

Wow Wednesday

This Month's Theme:  Winter Birthdays

Today's Prompt:  Turn up the volume on one of your past cards. 

Original Card

I created this card for a past Masculine Monday post.  I chose this card because it is a birthday card with various tones of green.


'


WOW Card


To change this card into a Winter Birthday Card, I added red and gold sequins.  I also added two snowflake die cuts (Casual Fridays Dies) using red glitter paper. - Kimberly