Sunday, December 31, 2017

Sweet and Simple Sunday

Happy New Year

Hi, Kimberly here as this week's CADC Designer.

This Month's Theme is:  Winter Birthdays

Today's Prompt:  Sweet and Simple Sundays

Today's Color Scheme: Blue, Silver, White


The card base is smooth blue c/s.  Bothe the Snowflake and sentiment stamps are Casual Friday's (from two different StaThmp of Approval collections).  The images are stamped with Hero Arts Unicon Pigment Ink (white).  The silver accents are Stickles.  - Kimberly

Monday, December 25, 2017

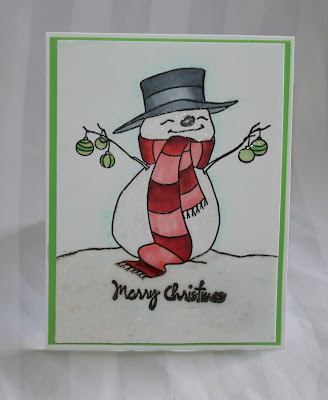
Merry Christmas!


We'll see you in 2018 with all new content daily and we can't wait to see what you create too!
Tag us on social media #CADCBlog

Happy Crafting
Theresa and the entire CADC Blog DT Team

Friday, December 22, 2017

A Snow-many Holiday

Today's challenge is to create a holiday card with a snowman or snow women or family. LOL

Be creative and make it your own.

First up is Theresa with her snowman diecut card.

This card was created using a plain white snowman diecut. I believe it was an Elison diecut, but who knows it has been in my stash for ages.  I used Copic markers to create the shadows, eyes, nose and buttons and to color the arms and hat.  I then heavily applied clear Wink of Stella over the entire diecut.
It is applied using foam tape over the snowflake patterned paper, which comes from a 4x6 mat stack. 
Up next is Denise's card:
I cut the snowman using my Explore and the Quilted Christmas cartridge. I didn't use the face from the cut, but instead used a stamp from Peachy Keen. I love those stamps of faces and have a some different sets.  The paper is from Carta Bella. ~ Denise

Get snowy today!

Happy Crafting
Theresa 

Wednesday, December 20, 2017

More Non-traditional Holiday Cards

Have you tried using non-traditional colors? Give it a try! You'll be surprised how much fun it is.


Monday, December 18, 2017

Non-traditional Colored Holiday

Mistletoe Monday...Originally Posted 5-23-16

What do all these supplies have to do with a holiday card?


They turn into this...


I used a rainbow of sorts of Stampin' Up inks and stamp &
Neat & Tangled die from  from the holiday SOA collection 
to create my non-traditional colored holiday card. 
The mat and diecut are from a piece of Ranger Distress Paper.  
* Hint * save $ and paper by diecutting from the center of your mat piece
no one will know it's not a solid piece and you save $ by saving paper.

A few more cards with non-traditional holiday colors...
I got out the Ranger Distress Inks and some Heidi Swapp Color Mists 
and did a little emboss resist and lots of color blending and spritzing on these cards.


Well what do you think? Are you game for trying non-traditional holiday colors to create your holiday cards? Go for it! They just might become your favorites. ;)

Happy Crafting
Theresa

Friday, December 15, 2017

A Foiled Holiday

Mistletoe Monday...Originally published 6-20-16

Today's Mistletoe Monday Challenge:
Use a foil or metallic card base.


Today's  challenge  was to use a metallic or foil card base.  Ok, I have some Tim Holtz metal and I hate to share lol!  But I did bust it out for the challenge.  I used a Sizzle embossing folder then mounted the metal on a green check base.  The stamp is from Deep Red.  I stamped it with Memento Tuxedo  Black and embossed with clear embossing  powder.  I colored it with my Spectrum  Noir  alcohol  markers.  I fussy cut it.  Really like how it turned out. ~ Gracie


For my card, I used a piece of silver shimmer paper and the Sizzix snowflake embossing folder from the Textured Impressions set – Plaid and Snowflakes. Using ink blending tools and distress inks (tumbled glass and faded jeans) to randomly add colour to a piece of white cardstock. I cut a 2” x 3” piece and using Stampin’ Up’s Ornate Tag Topper punch to create a tag. The sentiment is from Stamp Of Approval’s Holiday Magic collection – CASual Friday’s Snowy Sayings stamp set. The snowflake is cut from a scrap piece of silver shimmer paper using Stamp of Approval’s Holiday Magic collection – CASual Fridays’ Funky Flakes Fri-Dies. To complete the card, I used some silver twine to “hang” the tag and for the bow. ~ Sue


To make this flip card, I broke out my Snowflake Card Thinlit Die to cut my Brushed Silver card base. Sadly, both the die and the Brushed Silver are retired.  I'm looking for a new resource for the Brushed Silver and Gold card stocks if you happen to know any.  The DSP on the snowflake is Stam[in' Up's Wintergreen digital DSP.  That's topped by Silver Glimmer Paper and Island Indigo pieces, each cut with companion dies to the Snowflake Thinlit.  On the right side of the card I added Winter Frost Specialty DSP layered on a mat of Island Indigo.  I created the greeting using a cut file I purchased in the Silhouette store which I converted to print only and color matched it to the Island Indigo.  Inside, I used a digital stamp from Stampin' Up as the sentiment.  ~Kim from Katydid Cards


It always amazes me when DT members take a challenge in the same way.  All three designers today,
used or created embossed foil for the card base and yet the cards are so very different.


Happy Crafting
Theresa & the CADC DT and Guests

Wednesday, December 13, 2017

Gold & Silver Holidays

Mistletoe Monday...Originally Posted 6-27-16

Today's Mistletoe Monday Challenge:
Use gold or silver as the only ink/embossing powder for the design.
Use a dark colored card base (black/navy/etc).


Using my darkest blue that wasn’t “blackish”, I dry-embossed (using my Cuttlebug) a wintery scene. Embossing ink and powder were adhered in silver, then heated up the gun and WHOOSH! I watched the melting effects create a silvery nighttime snow. 
(Please don’t mind if it’s a beat stormy-looking…)  ~Lisa
Supplies:
Cardstock: Reflections (Michaels Stores)
Embossing Ink: Inkssentials
Embossing Powder: ZING! (Silver)
Embossing Folder: Cricut-Cuttlebug (Provocraft)


Starting with a 3.5 x 5 black card base, I stamped the sentiment and floral piece, from the Gina K Designs Stamp TV kit Better With You, with Versamark Ink and then heat embossed with Hero Arts silver embossing powder.  I lined the stamped piece with an embossed silver cardstock from Create & Craft and then attached all to a black card base.  I chose simple embellishments in the right hand corner to balance everything out.  The beauty of silver against black doesn't need much! ~Colleen


I used Gold and Silver Delicata Ink to stamp the ornaments and to create the
sheet underneath. 


I used Silver Delicata Ink with clear embossing powder to create this background.
This is one of my most favorite cards I've made. I just love how it turned out.  ~Theresa

Here's a few more cards for this challenge:

Delicata Silver Ink set with WOW clear embossing powder on Stampin' Up Paper.

Delicata Gold Ink set with WOW clear embossing powder on Stampin' Up Paper.


Delicata Silver Ink set with WOW clear embossing powder on white cardstock.


Happy Crafting
Theresa & the CADC DT & Guests

Monday, December 11, 2017

Anything Goes Holiday Cards

Mistletoe Monday...Originally Posted 8-22-16

It's Mistletoe Monday and the challenge is Anything Goes.

Sue created this elegant card - 
I created this card with three of Catherine Pooler’s Stamp of Approval Holiday Magic box’s stamp sets. To make the background, I used The Ton’s Holiday Flourish with Hero Arts Shadow Ink Field Greens and Pale Tomato.  For the center panel, I used Winnie and Walter’s Holiday Trimmings stamp set with Hero Arts Shadow Ink Pale Tomato for the red strips. The sentiment is from CAS-ual Fridays’ Snowy Sayings stamp set. I added three pearls to balance the off-set sentiment.

And the card by Angie -
I really love Christmas. It is by far my favorite time of the year. I tried to keep this card simple. The image is from the Merry and Bright ATS from Fun Stampers Journey, I stamped it onto a piece of white cardstock using River Rock ink. I then embellished the image using the Journey Sequins-Blue Skies, which were glued on with glue dots. The patterned paper is from the Winter Fresh Prints mini pad. Also, I embossed the front of the card with the Beach Towel Embossing Folder by Fun Stampers Journey. 


Now my cards for the challenge: 

I made several cards based on this video by Jennifer McGuire Ink


I used Ranger Distress Inks for all the backgrounds and Perfect Pearls or 
Pearl EX Powders to create the faux metal effect. 
I used a variety of Darice and Sizzix embossing folders.

Hope you like them.  I highly recommend giving this technique a try. 
It is lots of fun and produces an awesome card.

Happy Crafting
Theresa

Friday, December 8, 2017

Creating cards with winter scenes...

Mistletoe Monday Challenge...Originally Posted 4-4-16
Create a card with a winter scene...bonus if your scene includes a stocking.


I used my silhouette to cut out this out and put some Tim Holtz rock candy glitter on it. ~Denise


I created the front of this card using a cut file from the Silhouette Store; however, I changed it to a print file after coloring it to match the other elements in the card.  I then matted it on gold and red mats with decorative "Art Deco" corners.  The little stocking in the lower corner is a Recollections button.  The business end of this card is actually inside.  It's a pop-up with a fireplace and roaring fire with the Christmas stockings hung...awaiting Santa's visit.  The l-o-n-g stocking belongs to my dog, Katy.  This was created using a cut file; again from the Silhouette Store.  The digital papers are from the All That's Magical kit by Traci Reed.  ~Kim

Try thinking outside the box, perhaps you don't own stamps that will make a
winter scene but you have a diecut machine, stickers, digi stamps or print a free coloring page.


I used a Bendy Snowman Scene cut file purchased in the Silhouette Store.  I used Bazzill card stock in very pale blue, light blue and medium blue for the background.  For the snowman, I used Stampin' Up's Whisper White, Basic Black, Basic Gray and Real Red (which I also used on the fence) and a scrap of Only Orange for the carrot nose.  The trees are cut from scrap paper.  ~Kim


 I used a cut design called Christmas Cards Sleigh from Cricut and cut it on my Explore.  I have made this card in the past as a Shaker card and used solid colors.  This time I decided to change things up a bit and use different patterns.  That is a stretch for me because I don’t tend to mix a lot of things up, but I love quilts and thought of this as an appliqué design. I didn’t like anything I picked out for a busy background and so stayed with a solid, but one with some shading in it.  I also went to ink around the edges and messed it up a little, so I ended up highlighting by swirling on some distress ink on the frame.  The paper is from a 6 ½” pad by Kaiser Craft called Holy Night. The stamp is CTMH – Just to Say and the ink is Tim Holtz Distress – Fired Brick.  ~Denise

Happy Crafting
Theresa & the CADC DT

Wednesday, December 6, 2017

The holidays go to the animals...

Mistletoe Monday...Original Posts from September 2016
For Mistletoe Monday include an animal


This card was super quick since the papers and the stickers used were all from a Carta Bella collection called Warm and Cozy.  I liked the rustic look of this kit.  You can get so many cards and layouts from these types of collections since all the papers and embellishments go together. – Denise


Sue included this fun reindeer 

Looking through my stamps, I found this super cute reindeer from The Alley Way’s Fa-La-La stamp set. I added colour with copic markers. The sentiment is from Simon Says STAMP Ornaments stamp set. I found some scraps from Basic Grey’s Wassail paper line which I used to create the background. To make the reindeer panel pop, I matted it with a piece of black cardstock. -Sue

Tantalaya choose a bird for her card -
I used Stampin' Up! Among the Branches stamp set. I then stamped the sentiment to look like it was attached to the tree branch by drawing a line up with a micron archival ink pen and then did the same thing with the ornaments completing the circle around the branches. To finish the card off I added pink taffeta stickles to the center of each snowflake and then added sparkling clear mix sequins from Pretty Pink Posh.

Now Gracie has this card with some great folds and a cute cat stamp.
.

Hampton Arts stamp - fun!  I cut the card base on my Silhouette. I stamped my images on whisper white cs with Memento  Luxe  Tuxedo  Black ink and embossed  with  clear embossing  powder .  I water colored my images then fussy cut them.  I put some brick red cs on the panels if the card then attached my cat and mice.  Ready for the tree to be up so I can pull  the  cats out all through December!  The heat index is just 100 degrees today. ~ Gracie


Sometimes it is fun to look through our stamps and create things we haven't done for a while, so look for an animal from your stash to use. - Denise

Well here's my take on this challenge:


I challenge you to get out your cute and cuddly creature stamps and create something holiday
with them.  Take them to someplace you wouldn't normally think about them.

Here I've used Paper Smooches stamps to create two different cards for Christmas.
By keeping the animals all white and gray they look more "arctic" and thus more holiday.


Add accessory stamps or die cuts to give them a holiday themed outfit.
Here my moose sports a Santa hat but it could be scarf or stocking cap.
You could even use something like a sled, snowman or inks and masking like I've done
to create a winter scene. 


Have fun with the stamps you have and stretch their uses to more than just a 
cutesy kids card.

Happy Crafting

Theresa

Monday, December 4, 2017

Bold Sentiment Holiday Cards

Mistletoe Monday... Challenge Originally published 10-10-16

The challenge today is to use a big sentiment.  
Tantalaya starts with this very elegant card that proves Christmas cards 
do not have to be colorful to make a real impact-


For this card I used the stampin' up! set called Snowflake Soiree and I used Stampin' Up! inks and Versafine ink to create a layered snowflake look. To finish it off I stamped the Believe and then covered in clear embossing powder giving a pretty shine over the card. - Tantalaya.

Gracie really made the sentiment stand out with this card-


I started with my sentiment .   I die cut the "merry" from red cs and touched it up with clear wink of Stella to make it sparkle.  I used a Darice snowflake embossing  folder on whisper  white  cs and lightly rubbed the snowflakes  with Tim  Holtz  peacock feathers distress ink. I mounted the panel on light blue cs. I added the "merry" and a few clear rhinestones  I  colored light blue with my Spectrum  Noir TB3 marker. The card is a white cs base. ~ Gracie  

What sentiment can you use to make the focal point of your next holiday card? - Denise


Well I took this challenge today and here are the cards that I came up with:


Yes, a large sentiment can support an entire card.  
Have you made your holiday cards yet?

Happy Crafting 
Theresa