Thursday, August 31, 2017

Technique Thursday #35-2017

Our technique today doesn't require any fancy tools, just a pencil with an eraser.  A sample of it can be found here.

Sue made this cheerful card using this method.


I’ll admit it. I hadn’t really considered the eraser end of a pencil to be an ink applying tool before. I started with the sentiment from Simon Says STAMP Big Scripty Greetings placed towards the bottom of the card. I tried to mimic bubbles rising using the pencil eraser and Hero Arts strawberry, orange soda and lemon yellow ink.  Interesting technique – for sure! - Sue

Wednesday, August 30, 2017

Card Sketch Wednesday #35-2017

Sue had this card sketch as a start for her card.

Sue's card is a great take on the sketch.


I started with Authentique’s Strong collection 6x6 pad for inspiration and used papers for the background and the triangle piece. I used Stampin’ Up’s Ornate Tag Topper punch to create the two tags. I used Simon Says STAMP’s Summer Garden stamp set for both the flower and the sentiment. I used markers, Distress Ink Ripe Persimmon and Stampin’ Up Crushed Curry to add colour to the flower, which was fussy-cut. - Sue


Tuesday, August 29, 2017

Sympathy Tuesday #35-2017

Simple and striking is Sue's sympathy card.


For my card, I masked off an area exposing a 2” circle, where I added colour with ink blending tools and distress inks (mustard seed, spiced marmalade, faded jeans) to mimic a sunset. Before removing the mask, I stamped the grass and dragonfly using Technique Tuesday’s Wildflowers stamp set. I have to say, I think that this is my most favourite stamp set. The sentiment is from Simon Says STAMP’s Flower Friend stamp set.- Sue

Monday, August 28, 2017

Youth Monday #35-2017

Youth Monday's have brought us some really cute cards and Sue has another one.


I’ve had the Paper Smooches Birthday Buddies stamp set for quite some time and just never seemed to have the right occasion to use it. I took it with me when visiting a friend and created this card. I think it’s super cute. I used distress inks  (mustard seed, wild honey, festive berries, twisted citron, salty ocean) with a water brush to add the colour. I used a rhinestone for the birthday cap and glossy accents for the bird’s eyes. I popped the panel up with dimensionals. The sentiment is from the same stamp set. I love pun-ny sentiments! - Sue

Sunday, August 27, 2017

Shine and Sparkle Sunday #35-2017

We start our last week of August with a shiny card from Sue using a classic embossing folder.


I found a shiny piece of silver cardstock and used Cuttlebug’s Diamond Plate embossing folder which was one of the first embossing folders I had purchased. I like using it for masculine cards, usually with a car or motorcycle stamped image because the diamond plate reminds me of a tool box. I used CTMH’s D1216 Finish Line stamp set for the car image. Couldn’t figure out a “good” place for the sentiment so I left it without one. It’s difficult to get a good picture. Trust me, it’s really shiny! - Sue


Saturday, August 26, 2017

Shapely Saturday 34-2017

Shapely Saturday means making a card that is any shape but square or rectangle.

This adorable card makes you want to start rocking.


Oh, my.  The item I used for this card is one I have been "saving for the right scrapbook page".  Admit it.  You all have been there.  I know, I know, I should have purged it already but I am happy I didn't because now I can use this card :)  I chose to make a rocker card so I needed a rocking horse!  These are so simple to make.  You start with a regular A2 card and simply cut an oval shape on the edge so the card will rock!  I used blue cardstock for the card and patterned paper for color at the top.  I had a vellum sentiment from old Creative Memories and I attached it to the patterned paper.  All done! ~ Gracie 

Friday, August 25, 2017

C.A.S.E A Card Friday #34-2017

It is always fun to see what elements the designers take from the inspiration card to make their C.A.S.E. card. Here is today's.

C.A.S.E. card


Gracie's card.


Inside

For today's card I used some paper I have had a long time.  I paired it with blue cardstock to make a card base.  I turned the card sketch sideways.  The stamp set is new - it is "Need Coffee" from Pink & Main. (I love supporting her - she has a form of MD and a portion of her profits go to MDA).  I stamped and embossed her with Versamark ink and Memento Luxe Tuxedo Black ink.  She is colored with Spectrum Noir markers.  The sentiment is from the stamp set.  I also added a coffee cup from the set to the inside of the card. ~ Gracie 


Thursday, August 24, 2017

Technique Thursday #34-2017

Today's technique is called double offset stenciling.  You can see how to do this here.


Gracie shows how versatile this can be when you mix your stencils.


Well, this was fun!  I used several stencils and distress inks.  I started with a base layer using lighter inks and progressed by moving the stencils and using darker inks.  Using different stencils makes unique patterns.  I die cut the butterflies and the center from my stenciled paper.  I added the sentiment in the center and attached the butterflies with pop dots for dimension.  I added baker's twine and rhinestones.  I put the panel on a green cardstock base. ~ Gracie 

Wednesday, August 23, 2017

Card Sketch Wednesday #34-2017

Gracie always makes a card sketch into a great card.

This is the sketch for today.


And Gracie's card.

For today's challenge I used a stamp set from I Impressions I have had for at least 3 years.  I stamped the images on white cardstock with Versamark ink and heat embossed them with Ranger silver embossing powder.  I colored the images with Spectrum Noir using a pink marker then cut each image into a square.  I mounted the squares on black cardstock then placed them on silver shimmer cardstock.  I stamped the sentiment and added heat set rhinestones.  The panel was placed on a white cardstock base. ~ Gracie 


Tuesday, August 22, 2017

Sympathy Tuesday #34-2017

Gracie has a beautiful sympathy card today.


This is one of my favorite cards I have made in a while.  I used a stamp set from Heartfelt Creations that I received from my Secret Sister.  It is absolutely beautiful.  I stamped it on patterned paper I have had for a long time - I do not remember the source.  I embossed it and colored the image with Spectrum Noir markers.  I cut the patterned paper with an oval just to do something different and really liked how it turned out.  I mounted it on a brown cardstock base and added black enamel dots.  I believe the sentiment is from Raisin Boat. ~ Gracie 

Monday, August 21, 2017

Youth Monday #34-2017

It is Monday, so our challenge is to make a youth card and Gracie came up with this cutie.


Inside


Today I started with blue enamel heat set dots I have had over a year.  I love them.  I will be heartbroken when I won't be able to find them on Amazon.  I made a cardstock base of orange and added a strip of green to the center.  I stamped a set of images from Raison Boat- they make me think of a movie I had to watch a million times when my 16 year old grandson was a toddler.  I colored them with Spectrum Noir markers.  I added the sentiment from the same set.  I also added 2 monsters to the inside of the card. ~ Gracie 

Sunday, August 20, 2017

Shine and Sparkle Sunday #34-2017

Let's shine and sparkle with Gracie today.


Our added challenge this week is to use something we have had for over a year - walk in my craft room - not a problem lol!  Today I chose some black and white ribbon and used it for inspiration.  I love black and pink together.  I found some pink polka dotted cardstock and made a card base.  Using white cardstock I embossed the flower and sentiment from a set from Raison Boat.  I colored the flower with Spectrum Noir markers and added some Wink of Stella for my sparkle.  I also added some glitter enamel dots.  I mounted the white panel on bright blue cardstock and turned it slightly before adhering. ~ Gracie 

Saturday, August 19, 2017

Shapely Saturday 33-2017

If you are looking for the Stamping on Patterned Paper Blog Hop, please click here or scroll down.

Rectangles can get a little boring, so Saturday's we mix things up by choosing a different shape.


I am always challenged when it comes to a shape card. Today's card I was inspired by a video from Scrapbooking with ME on YouTube. I used the Prima Rose Quartz paper collection and I changed up the closure on mine I used ribbon to tie it shut. and added a sentiment on the one side to keep it flat when you open it. Here is the link for the video where she gives measurements and everything, also this is called the Ultimate Twist card.  You can view a video on this fold here. - Tantalaya

Friday, August 18, 2017

Year of Techniques - Stamping on Patterned Paper

Welcome to the
Welcome to A Year of Card Techniques Blog Hop where each month we feature a different card technique.  We’ve assembled a team of card makers who range from new to advanced, so you’ll see a great variety of cards and ideas.
We all love our stamp sets and we all love our patterned paper.  Well, this month we’re combining the two by stamping ON patterned paper for some unique projects.  It will be fun to see what stamps and papers our team decides to pair together.   And if you would like to check out our past technique hops, you can do that here:
Our amazing sponsor this month is Card a Day Challenge Blog.
Please take a moment to check out the CADC blog here.
And the awesome prize this month is:
     and         No automatic alt text available.
We  really appreciate feedback, so please leave a comment on each of the  blogs in the hop today.   The winner will be announced on Sunday,  August 27, 2017 on A Piece of (my) Heart’s blog, so be sure to go back and check her blog to see if you are the winner!  If you would prefer to be notified, please leave your email address in the comments and someone will contact you if you win.    The winner will have until September 9, 2017 to claim their prize.  
You should have arrived here from Jodie. If you're visiting  here first, you might want to start at the beginning so you don't miss a thing and increase your chances of winning by commenting on  each blog.
Our team's cards for this challenge start with Gracie.


I made a trip to Tuesday Morning!  But I really found some bargains.  I got a pad of Graphic 45 paper for $2.99 and a Graphic45 stamp set for $3.99!  They were perfect for the cards I made for today.  The stamp set is "Time to Celebrate".  I couldn't decide which to use so I made 2 cards.  The 1st is feminine; the 2nd masculine.  I stamped no the with clear embossing powder and embossed with Ranger copper embossing powder.   It just looked vintage.  I added bronze charms to each card and twine to the masculine card.  I love the different patterns. ~ Gracie 

Denise has three cards.


In the past few years I purchased a couple of books from thrift shops.  One was Roget's Thesaurus published in 1977 for 45 cents and a volume of the Encyclopedia  Britannica published in 1907.  It is only one volume (XX Prussia to Rossetti) and the cover was torn and partially missing, so I bought it specifically to use in my paper crafting.  I looked through to see what would work with any stamps I had and decided that pages from the sections for "road" and "railway" would work great with  a stamp set from Graphic 45 called Come Away With Me.  I stamped the train and car on those pages and used the same sentiment as a banner attached with some plaid washi tape.  I blended with distress ink around both the tag and the torn page.  For the top card I took a page from the Thesaurus for plants and used the section referring to mostly flowers.  I stamped with an image from Unity Stamp Company's KOM for August called Never Be Afraid.  I painted it with Distress Inks.  I also painted a white piece of paper with the red Distress Ink used for the blooms and then stamped the sentiment from CTMH Holiday Tags Occasions.  A piece of red raffia ribbon and it was done. - Denise

Finally Sue brings us two cute cards.


I’ve made two cards, both are kind of similar. I stamped using outline stamps and fussy cut the images.

For the first card, I used Simon Says STAMP One With Nature stamp set. I chose three printed papers (in the green family) and stamped the trees. I fussy cut them. Then, keeping with the “nature” theme, I used some natural-fibre ribbon to separate the trees from the sentiment.

For the second card, I used Simon Says STAMP Artful Flowers stamp set. I chose three pink-ish printed papers and stamped the outline flowers. I fussy cut them. I used some Nuvo drops for the center of the flowers for a bit of shine. The sentiment is from Simon Says STAMP Flower Friend stamp set.- Sue 
Now you’re off to visit with Debbie. Hope you had fun and thanks for stopping by.  See you next month with another technique!
The Card a Day Challenge Design Team.
Here’s the full line-up in case you get lost:
Sharon
Claudia
Kim
Wilma
Jearise
Sandy
Jodie
Card A Day Challenge Team

Debbie
Amanda

C.A.S.E A Card Friday #33-2017

Friday is our day to Copy And Share Everything (C.A.S.E.). 


Tantalaya's card is a perfect C.A.S.E. of the above card.


I had fun with this card and yes I've used the same Concord & 9th stamp but really can you blame me.  I stamped using Versa fine black onyx ink and black embossing powder. I did a 2 tier stamping technique. To cover the space between the noncolored part of the flower and the water color part I used black ribbon to complete it. Then with a simple hello statement, the card is done. So I changed the color of the card and instead of thin separation, I used a 1/4 inch ribbon. I kept the style of the card and of course the flower being image that stands out with a bang. - Tantalaya

Thursday, August 17, 2017

Technique Thursday #33-2017

Watercoloring is the technique today and Tantalaya shows her talent with this card.


I used the Prima Princess stamp Stella for this card. It is also the biggest card I did this week at 5 x 7. I heat embossed the image on Bristol smooth paper and used watercolor pencils and inktense pencils. Both of these pencils activate with water the inktense ones are more vibrant color but you get similar effects. At the end, I splattered using a gold water color and added the thank you sentiment from Altenew Label Love French stamp set. - Tantalaya


Wednesday, August 16, 2017

Card Sketch Wednesday #33-2017

Today we start with this card sketch.


Tantalaya's take on the sketch is a great one.


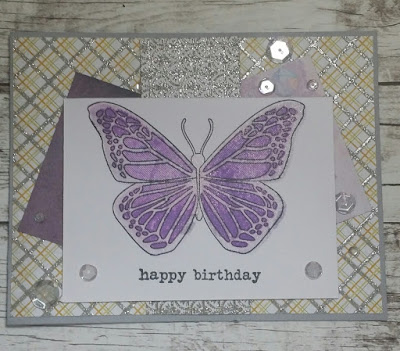
The sketch challenge I turned on its side. I used the Butterfly stamp set from Concord & 9th for the main sentiment. I used the 49 and Market paper in the purple, the yellow and silver papers are from a DCWV set. I then finished off the card with sequins from Pretty Pink Posh. I like sketches because they give the guideline and when you want to can break the rules and think outside the box.- Tantalaya

Tuesday, August 15, 2017

Sympathy Tuesday #33-2017

This sympathy card by Tantalaya is just lovely.


For this card, I used the bleaching technique. I stamped and embossed the same image from the Concord & 9th Hello Lovely stamp set on black paper with black embossing powder. I then took bleach and I keep a separate brush that I only use for when I am bleaching and began coloring in my image. to help move the bleaching process along I used my heat tool and when there were areas I wanted lighter I would add more bleach. I finished it with the sympathy sentiment and behind that, I put a piece of vellum as a shadow accent. - Tantalaya


Monday, August 14, 2017

Youth Monday #33-2017

Tantalaya's card is adorable and perfect for our Youth Monday.


This card I used a Wild Rose stamp fox and child. I stamped it in MFT Hybrid Black ink and I used Spectrum Noir color pencils. To get the soft smooth look I did use Gamsol and a paper blending stump to remove the lines from the color pencil. Then I added a sentiment from a sweet n sassy stamp set welcome baby. Then I just mounted it to a pattern paper that was in the same color family and attached it to an A2 size base. - Tantalaya

Sunday, August 13, 2017

Shine and Sparkle Sunday #33-2017

Tantalaya starts her week with this wonderful shiny card.


I used the Concord & 9th Hello Lovely stamp set.  I stamped it with Versa mark ink and embossed it using the Enchanted Gold embossing powder from Nuvo. Giving high impact and still, keeps it simple. I finished it off with a thanks sentiment embossed in white.- Tantalaya

Saturday, August 12, 2017

Shapely Saturday 32-2017

Let's see what fun shape Kimberly has for our card this Saturday.


How about a cute cupcake shaped card?  Sizzix hit it out of the park with this super cute die set.  The set is all inclusive so all you have to do is choose the paper!  The “old item” I used here is the card stock.  I pulled bits and pieces from my stash of leftovers.  I die cut the paper and put it all together.  Easy Peasy. - Kimberly

Friday, August 11, 2017

C.A.S.E A Card Friday #32-2017

C.A.S.E. is also another way to give inspiration for using older supplies in a new way.

This is the card we are using today.


Kimberly is up to the challenge.


Nautical cards are among my favorite to create.  For my card, I went with the nautical theme, the woodgrain background and the dry embossing.  I dry embossed the background panel with a Tim Holtz embossing folder (old Item) and attached it to the card base.  I adhered the rope type embellishment with Tim’s tiny attacher tool to the woodgrain cardstock and adhered that to the panel.  The stamped image is from one of Tim’s mini blue print sketch sets (old item).  I colored the image with water based markers and accented with glossy accents.  The sentiment is Penny Black (old item).  - Kimberly


Thursday, August 10, 2017

Technique Thursday #32-2017

Today we are going to use mixed media as our technique.  This basically means that you use more than one medium in making a card.

Kimberly has a wonderful texture on her card.


This month, we were asked to use three types of different media and to use something we have had for over a year.  The three media I used are:  Distress Oxide Inks, Dina Wakley Acrylic Paint (old item) and Archival Ink.  I applied Distress Oxide Inks to a gel plate and smoothed it out with a brayer.  Then I used large bubble wrap to create the circles.  Next, I applied Dina Wakley paint to a butterfly Art Foamie with a brayer.  I applied the paint with a brayer because I wanted to create a light, semi-transparent image.  I stamped the sentiment (old item) with Shadow Grey Archival Ink.  Again, I chose a light ink to keep the image semi-transparent.  I adhered the panel to black card stock and attached to the card base.- Kimberly

Wednesday, August 9, 2017

Card Sketch Wednesday #32-2017

A sketch can allow you to use your old stash in a new way. Here is today's sketch.


Kimberly did a smashing job with it.


This month, we were asked to use three types of different media and to use something we have had for over a year.  The three media I used are:  Distress Oxide Inks, Dina Wakley Acrylic Paint (old item) and Archival Ink.  I applied Distress Oxide Inks to a gel plate and smoothed it out with a brayer.  Then I used large bubble wrap to create the circles.  Next, I applied Dina Wakley paint to a butterfly Art Foamie with a brayer.  I applied the paint with a brayer because I wanted to create a light, semi-transparent image.  I stamped the sentiment (old item) with Shadow Grey Archival Ink.  Again, I chose a light ink to keep the image semi-transparent.  I adhered the panel to black card stock and attached to the card base.- Kimberly


Tuesday, August 8, 2017

Sympathy Tuesday #32-2017

A striking sympathy card from Kimberly.


The anchor is a Tim Holtz Blueprint Sketch stamp (old item), embossed with fine white embossing powder onto watercolor paper. I used several colors of distress ink (old item) and an ink smooshing technique to create the background. The embossing powder created a nice resist.  I used distress ink to color the sentiment (old item – I don’t recall the designer) and adhered to the panel.  Next, I adhered the panel to blue card stock and then to the white c/b.  - Kimberly


Monday, August 7, 2017

Youth Monday #32-2017

Kimberly has a wonderful spinner card that any kid would love.


The stamp set I used is by Avery Elle (old item).  I stamped the fish onto water color paper and colored with water based markers.  I used a Lawn Fawn die set to create the spinner.  The fish is attached to a penny that is hidden behind the circles to allow it to spin around the card.  Any child would love an interactive cute card!  The card base and patterned paper is also by Lawn Fawn.- Kimberly

Sunday, August 6, 2017

Shine and Sparkle Sunday #32-2017

We add an additional challenge for the month of August.  Use something that you have had for over a year.

Kimberly has this wonderful shine and sparkle card. 


Closeup

I created this card by adhering a paper napkin to white c/s.  Next, I applied clear versamark ink to the entire panel.  Finally, I sprinkled a good amount of Ranger Holographic Embossing Powder (old item) and melted with a heat tool.  This is a quick and way to create a card with stunning results. - Kimberly


Saturday, August 5, 2017

Shapely Saturday 31-2017

This is the day for shaped cards and with football season coming, this card is appropriate.


Card open

Our family really enjoys football and my sister-in-law is a super Ohio State fan, so I made the card for her.  The card is from the Circut cartridge called Autumn Celebrations. I sized it to be about 7 inches long so that the dots on the Sizzix embossing folder I used would look the right size.  That meant that I would have to make a separate front that could fit into my Cuttlebug.  I also had to do part of it on one pass and then carefully line up the dots to do the end of the panel since the embossing folder is only 5.5 inches long. I used distress ink along the edges and gently rubbed with a blending tool across the dots to make them show a little more.  The inside was written by my Explore.  The Block O was done on the Explore using Varsity Letters. The buckeye leaf was done by sizing and welding leaf shapes together. The buckeye itself was actually made by reshaping circles in Design Space and then cutting in vinyl since it was so small.- Denise

Friday, August 4, 2017

C.A.S.E A Card Friday #31-2017

It is always fun to see how a C.A.S.E. card will be the same and how it will be different.  How would you C.A.S.E. this card?


Here is my card with some variation.


I used a Zizzix embossing folder that was a thank you motif instead of the birthday.  I also decided to use various blue cardstock from my stash to make an ombre effect instead of rainbow. I cut strips 3/4" x 5 1/2" and arranged them on my embossing folder in the order I wanted them to be on the card separating them slightly. I was able to send it through my Cuttlebug without securing them, but you could use washi tape to hold the cardstock in place.  I trimmed the ends slightly and then notched them at the bottom before attaching them to a black card base.  The sentiment is from an American Craft sticker set called Thank You- set 1 stuck to a label made from the same card stock as the lightest blue. - Denise